Change the security features
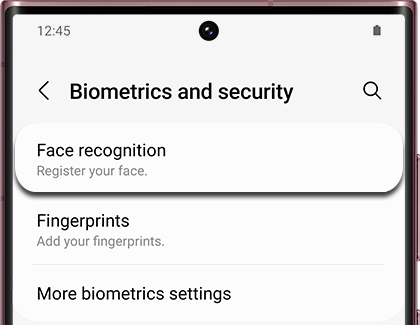
Whether you want to use face recognition to sign in to your phone, update your phone’s software, or set up Samsung Pass, you can find everything you need in the Biometrics and security menu. Navigate to and open Settings, and then tap Biometrics and security. The following options will be available:
Face recognition: You can unlock your phone and verify yourself when using apps with face recognition. Tap Face recognition, then tap Continue, and then follow the on-screen instructions to register your unique face.
Fingerprints: You can unlock your phone and verify yourself when using apps with your fingerprints. Tap Fingerprints, then tap Continue, and then follow the on-screen instructions to register your fingerprint. You can add additional fingerprints to your phone as well.
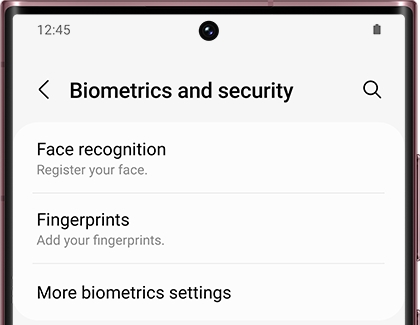
More biometric settings: You can turn on the option for Show unlock transition effect when unlocking your phone, or check the security patch version.
Google Play Protect: Google Play Protect regularly checks your apps and phone for harmful or concerning behavior. You can manually scan for threats by tapping Google Play Protect, and then tapping Scan. You’ll see recently scanned apps from this screen as well.
Security update: This option lets you access different update settings for your phone. You can check for software updates, view your software update history, view Smart updates, and use the Software Upgrade Assistant.
Google Play system update: Check for available Google Play system updates for your phone. Tap Google Play system update, and then tap Download & install. Your phone may need to restart to finish installing. If prompted, tap Restart now.
Find My Mobile: Find My Mobile helps you locate your missing Galaxy device, such as a phone, tablet, watch, or earbuds. You can use the Find My Mobile website to locate and remotely lock or unlock your device, or you can select from the available options in this menu. These options include Remote unlock, Send last location, and Offline finding.
Samsung Pass: Samsung Pass will keep your apps and accounts secure by authenticating your identity with biometric data. Samsung Pass will remember your login information for apps and websites as well.
Secure Folder: If you need to store private or sensitive information, such as files and photos, you can use Secure Folder. This folder will stay locked so only you can access it.
Secure Wi-Fi: You can use Secure Wi-Fi when connecting to public or unsecured networks. Tap Secure Wi-Fi, then tap Continue, and then follow the on-screen instructions to set it up.
Private Share: If you’re concerned about sending personal information, you can use Private Share to protect your messages and files. Only the people you choose will be allowed to see your information. Tap Private Share, then tap Continue, and then follow the on-screen instructions to set it up.
Samsung Blockchain Keystore: You can store private keys and virtual assets in Samsung Blockchain Keystore and Wallet. Tap Samsung Blockchain Keystore, then tap Continue, and then follow the on-screen instructions to set it up. You can create a new Wallet or connect a Wallet you’ve used previously.
Install unknown apps: This menu lets you install unknown apps if desired. Keep in mind that installing apps from this menu may put your phone and data at risk. It is recommended to install apps from the Play Store and Galaxy Store.
Encrypt or decrypt SD card: Encrypting your SD card will protect your data, since an encrypted SD card can only be read on the device that was used to encrypt it. Tap Encrypt or decrypt SD card, and then enter your security credentials if you have a screen lock set up. Review the information, and then tap Encrypt SD card. To decrypt the SD card, tap Decrypt SD card.
Note: This setting may not appear unless you have a SD card inserted in your phone.
Other security settings: Manage your preferences for additional security settings, such as password visibility, administrative apps, and credentials.
Set up a Lock screen and security
Set up a basic phone lock screen
To ensure your phone's security, you can set up a phone lock to use a password, PIN, or Pattern. That way, even if someone gets their hands on your phone, they won't be able to access it.
From Settings, swipe to and tap Lock screen. Then, tap Screen lock type and select your desired type of lock. Follow the on-screen instructions to set it up.
Here are the basic Screen lock types:
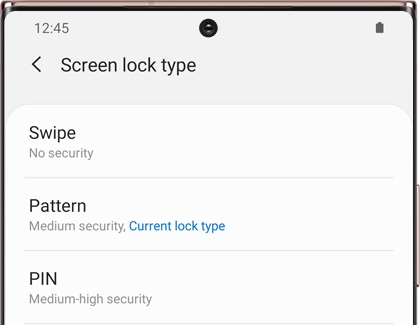
Swipe: Swipe the screen to unlock it.
Pattern: Create a pattern that you draw on the screen to unlock.
PIN: Select a PIN to unlock the screen.
Password: Create a password for unlocking the screen.
None: No screen lock.
Set up Biometric security phone lock
Note: The Iris Scan and Intelligent Scan features are only available on S8/S8+, S9/S9+, Note8, and Note9.
You can also set up Biometric security so you can unlock your phone with your face, your fingerprints, or even your eyes!
From Settings, swipe to and tap Biometrics and security.
Then, select your desired type of phone lock, such as fingerprints, and then follow the on-screen instructions to set it up.
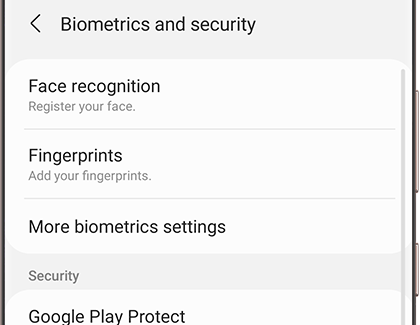
Here is a basic rundown of the available biometric options:
Fingerprints: Use fingerprint recognition to unlock the screen.
Face recognition: Use facial recognition to unlock your phone.
Iris: Use iris recognition to unlock the screen. Only available on select phones.
Intelligent Scan: Use face and iris recognition together for better accuracy and security. Only available on select phones.
Once you've set up a biometric security feature, make sure that you have it set on your Lock screen. For example, you need to have Fingerprint unlock activated if you want to unlock your phone with your fingerprints.
From the Biometrics and security page, just tap your desired biometric feature, and make sure the appropriate switch (i.e. Fingerprint unlock, Face unlock) is turned on.
Lock screen display settings
Not only does the Lock screen display time and notifications, it also lets you access apps and features without unlocking your Galaxy phone. With certain settings, you can get quick access to the camera, your schedules, alarms, and even contact information right from the Lock screen.
From Settings, tap Lock screen. Use the following settings to customize your Lock screen's appearance:
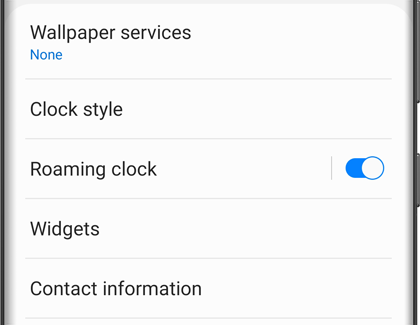
Wallpaper services: Set up a Dynamic Lock screen or Samsung Global Goals to get alternating wallpapers with special themes.
Clock style: Set the style and color for the clock on the Lock screen and Always On Display.
Roaming clock: You can set your home time zone. Your home time zones and local time zones will be displayed when you are roaming.
Widgets: You can set the Lock screen and the Always On Display feature to display things like Music controller, Today’s schedule, your Next Alarm, and Digital Wellbeing.
Contact information: You can add your contact information and it will be displayed on the Lock screen.
Notifications: Adjust the style and settings for notifications that appear on your Lock screen.
Shortcuts: Select apps to open from the Lock screen.
Secure phone lock settings
For extra protection, you can set up secure lock settings, such as an automatic screen lock when your phone is idle. However, these settings won't show up until after you've already made a Lock screen.
From Settings, tap Lock screen, and then tap Secure lock settings. Enter your current lock screen credentials. Then, turn your desired Secure lock settings on or off by tapping the switch.
Make pattern visible: Choose whether or not the pattern appears on the screen when you draw it. This option will only appear if you have a pattern set as your Lock screen.
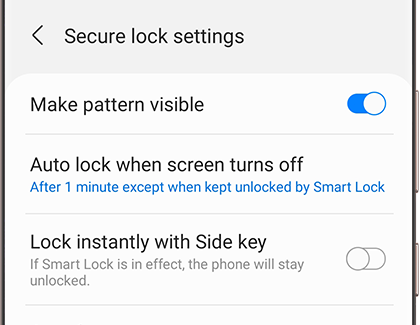
Auto lock when screen turns off: Set a time limit for when your phone will lock, such as 5 seconds, 10 seconds, 1 minute, or 5 minutes.
Lock instantly with Side key: Set your phone to lock instantly when you press the Side key.
Auto factory reset: After 15 incorrect attempts to unlock your phone, it will be reset to factory default settings, and all data will be erased, including files and downloaded apps.
Lock network and security: Keep network and security-related functions locked while your phone is locked, making it easier to locate and protect if it’s lost or stolen.
Show Lockdown option: Display a Power button option that turns off Smart Lock, biometrics unlock, and notifications on the Lock screen.
Samsung privacy settings
Samsung privacy settings
Your device comes with several privacy settings to help keep your personal data secure. In the Samsung privacy section, you can dictate app permissions as well as customize the advertising content you see in your apps.
To get to the Privacy section, navigate to Settings, and then tap Privacy. The following settings are available in the Samsung section:
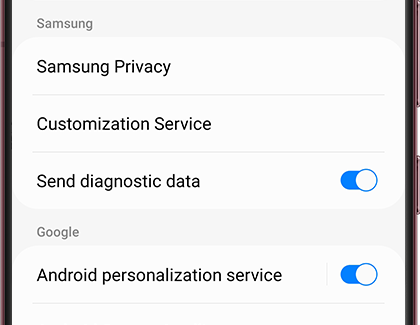
Samsung Privacy: Review Samsung’s privacy guidelines for additional information.
Customization Service: Allows you to personalize the content you receive in your apps, such as ads and marketing. You can also manage your personal data, erase your personal data, and disable customization services on other devices.
Send diagnostic data: Allow Samsung to collect diagnostic data from your device to improve its services.
You can also access the Permission manager from the Privacy screen to configure your desired permissions for the camera and microphone, as well as other services. Tap Permission manager, and then tap Camera or Microphone. Next, select an app to change the permissions. Choose your desired option, such as Allow or Don’t Allow.
Note: Depending on the service you choose, the options may also say "Allowed only while using the app" or "Ask every time."
Google privacy settings
Google offers additional privacy settings as well. From this section, you can enable location services, ads, and personalized recommendations on your device. To find this section, navigate to Settings, and then tap Privacy. The following settings will be available in the Google section:
Android personalization service: Turn this on to receive personalized content based on your app usage.
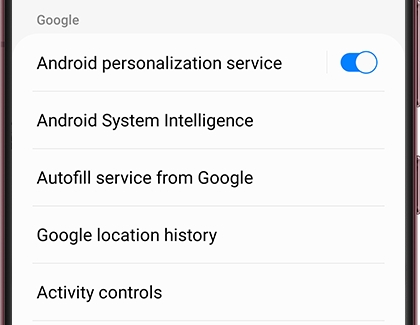
Android System Intelligence: View suggestions based on the content you look at. Your device will store this data for future use as well. You can also clear your device’s learned data.
Autofill service from Google: Allows you to automatically fill in certain information when browsing websites, such as passwords, addresses, and credit card information. You can edit your information at any time if you receive a new credit card, or if you prefer not to use Autofill.
Google location history: Enable this to save your device’s location. Google will then suggest personalized maps when you're traveling.
Activity controls: Your device will save your website and app activity to provide you with faster searching.
Ads: Reset your advertising ID or disable apps from using your ID.
Usage & diagnostics: Allow Google to collect diagnostic data from your device to improve its services.
Check which apps are using the camera or microphone
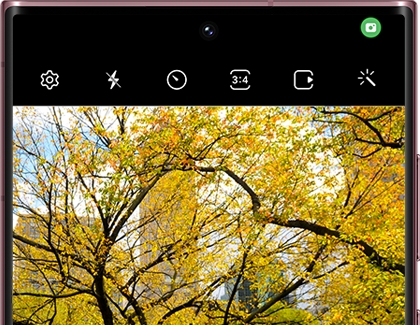
When an app is using either the camera or microphone, you’ll see a small green dot in the top right corner of your device's screen.
Maybe you have multiple apps opened and you're unsure which one is accessing the camera or microphone. There is a simple way to check this; when the green dot is on the screen, swipe down from the top to open the Notification panel, and then tap the green dot. You’ll see a pop-up notification with the app’s icon, as well as information about the camera or microphone. Then, you can find and close the app if you need to.
Use Facial recognition security
Set up Facial recognition
Note: To use Face recognition, you need to set a PIN, Pattern, or Password first.
Your face is unique to you, which makes it one of the best security features in your arsenal.
From Settings, tap Biometrics and security, and then tap Face recognition.
Tap Continue. If you don't already have a secure screen lock, you will need to set one up.
Hold the phone 8-20 inches away and position your face inside the circle. Hold the position until the progress bar reaches 100%. You may be prompted to remove your glasses to finish the process.
When you're done, adjust your desired settings, and then tap Done.
You can now unlock your phone by just looking at it! However, if you’ve set up a lock screen with Face recognition, your screen may request a PIN, Pattern, or Password under the following conditions:
At least once every 24 hours.
If 4 hours have passed without using the device.
If the device has been restarted.
Note: These additional checks are to help keep your phone secure.
Facial recognition options
Once your face is registered to your device, you can use additional security options and settings. To access these options, navigate to Settings, and then tap Biometrics and security. Tap Face recognition, and then enter your security credentials. The following will be available:
Remove face data: Delete the current face recognition data that is stored.
Add alternative appearance to enhance recognition: This is useful if you change your hairstyle, facial hair, or make up.
Face unlock: Unlocks your device when your face is recognized.
Stay on Lock screen until swipe: Remain on the Lock screen until you swipe even if you already used Face recognition.

Faster recognition: This will improve the recognition speed but also reduces security, increasing the possibility of a video or image being incorrectly recognized as your face.
Require open eyes: For added security, the device will only recognize your face when your eyes are open.
Brighten screen: Increase screen brightness temporarily so your face can be recognized in the dark.
Tips for Facial recognition
Show your face and your device unlocks: it doesn't get much easier than that. If you are having some difficulty, here are some facial recognition tips.
Glasses, hats, masks, makeup, bangs, and beards can affect the recognition process. Adding an alternative look can help the device recognize you in different situations.
Make sure you are in a well-lit area and the camera lens is clean.
For best results, make sure your image is not blurry.
Face recognition is less secure than Pattern, PIN, Iris, or Fingerprint.
Keep in mind your device can be unlocked by someone that looks similar to you (such as a twin).
If you are having trouble unlocking your device, you can use Find My Mobile and other methods to remotely unlock it.
If you are having difficulty unlocking with Face recognition, try the face registration again. Remove the current face data by opening Settings, and then tapping Biometrics and security. Tap Face recognition and then enter your credentials. You can now tap Remove face data to clear the facial recognition data so that you can have a fresh start.
Set up and use the fingerprint sensor
Find the fingerprint scanner's location
Note: The A10e, A01, and A02 do not have fingerprint scanners.
Depending on which Galaxy phone or tablet you have, the fingerprint scanner may be in a different location. Make sure you know the location before you start registering your prints.
Phones with an in-display fingerprint reader:
S22, S22+, and S22 Ultra (Ultrasonic sensor)
S21 5G, S21+ 5G, and S21 Ultra 5G (Ultrasonic sensor)
S20 5G, S20+ 5G, and S20 Ultra 5G (Ultrasonic sensor)
S10, S10+, and S10 5G (Ultrasonic sensor)
Note20 5G and Note20 Ultra 5G (Ultrasonic sensor)
Note10, Note10+, and Note10+ 5G (Ultrasonic sensor)
A50, A51, A53, A71, A42 5G, and A52 5G (Optical sensor)
Phones with a fingerprint reader on the back:
A11, A20, and A21
S8, S8+, S9, and S9+
Note8 and Note9
Tab S5e, S6, S7, and S8
Tablets with an in-display fingerprint reader:
Other locations for the fingerprint scanner:
The Z Fold's and Z Fold2's scanners are located below the Side key. The Z Fold4 and Z Fold3's scanner is on the Side key itself.
The Z Flip, Z Flip 5G, Z Flip3, and the Z Flip4's scanners are located on the Side key.
S10e has the scanner on the Power key.
The A23 5G, A32, A13 5G, A13, A12 and A03s fingerprint scanners are located on the Side key.
Phones with a fingerprint scanner on the Home key:
S7 and S7 edge
S6 and S6 edge
Tab S2 and S3
Tablets with a fingerprint scanner on the Home key:
Set up and use fingerprint security
It's time to set up fingerprint security and register your prints. The steps will be almost exactly the same, no matter what device you have. The only difference will be where the fingerprint sensor is located.
Navigate to Settings, tap Biometrics and security, and then tap Fingerprints.
Enter your lock screen credentials. If you do not have a screen lock set up, you may be prompted to create one at this point. When you're ready, read the information, and then tap Continue.
Use the on-screen prompts to register your fingerprint. When registering your fingerprint, make sure to fully cover the fingerprint sensor with your finger to prevent strong light from entering the fingerprint sensor. When you're finished, tap Done.
Next, make sure that the switch next to Fingerprint unlock is turned on.
Note: If the fingerprint sensor on your device is located on the Side key or below the Side key, you can disable the "Fingerprint always on" option to prevent accidental unlocks.
To unlock your device using your finger, tap the screen or press the Power key or Side key. Then, place the registered finger on the fingerprint scanner, wherever it's located. The device will automatically unlock if it recognizes your fingerprint.
Once your fingerprint data is registered, review the security options and settings:
Rename a fingerprint: Tap the desired fingerprint, enter the new name, and then tap Save.
Remove fingerprint data: Tap your desired fingerprint, and then tap Remove.
Add fingerprint: Add additional fingerprints to your tablet.
Check added fingerprints: Test your registered fingerprints to see if the tablet recognizes them.
Fingerprint unlock: Unlocks your tablet when your fingerprint is recognized.
Show an icon when screen if off: Choose when a fingerprint icon appears on your screen. You can choose between Always on Display, Tap to show, and Never.
Fingerprint always on: You can scan your fingerprint even when the screen is off.
Show animation when unlocking: Show an unlock animation when scanning your fingerprint.
About unlocking with biometrics: View information about unlocking your device using biometrics.
About fingerprints: View tips for unlocking your device.
Keep in mind that when your device has restarted or if your device has not been used for more than 24 hours, you’ll need to use your PIN, password, or pattern instead of your fingerprint.
Note: Some devices may come with a pre-installed plastic screen protector designed to work with the in-screen sensor. Installing another screen protector may affect fingerprint recognition.
Add additional fingerprints
It may be more natural to use a different fingerprint to unlock your device if you're holding it in another hand, or in another orientation. Thankfully, you can add multiple fingerprints so you can unlock your device however you hold it.
From Settings, tap Biometrics and security, and then tap Fingerprints.
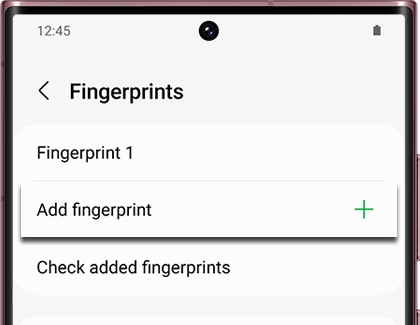
Enter your secure screen lock credentials and then tap Add fingerprint.
Follow the on-screen prompts to add the fingerprint, and then tap Done.
Remove a fingerprint from your device
Although their fingerprint sensors are in different places, removing a fingerprint is exactly the same on all devices with Android 9.0 or higher.
From Settings, tap Biometrics and security, and then tap Fingerprints.
Next, enter your security credentials and then tap the fingerprint you want to delete (e.g., Fingerprint 1).
Tap Remove and then tap Remove again to confirm.
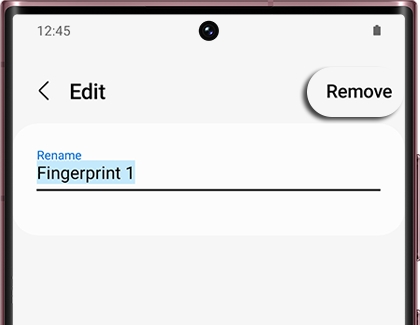
Note: Removing all registered fingerprints will turn off the Fingerprint unlock feature by default.
Trouble unlocking device with fingerprint
If you are having trouble unlocking your device because the fingerprint sensor isn't recognizing your prints, try entering your regular PIN, password, or pattern. If that still does not work, you can try remotely unlocking your device using the Find My Mobile feature or another method. Please read our guide on Unable to unlock Samsung phone or tablet's screen to learn more.
Set up and use Samsung Pass
Set up Samsung Pass
Note: You must be signed into your Samsung account to use Samsung Pass.
Do you want to sign in by having your phone scan your fingerprints? You can register your fingerprint data when setting up Samsung Pass. On certain device models, you will also be able to scan your iris to authenticate your identity.
From Settings, swipe to and tap Biometrics and security, and then tap Samsung Pass.
Tap Continue, and then sign in with your Samsung account credentials.
Tap Continue to begin setting up your biometric data. Select Pattern, PIN, or Password, and then follow the prompts.
Note: If your device includes an iris scanner, there will also be an option to use iris identification.Next, you will need to register your fingerprint. Follow the on screen prompts, and then tap Done.
You can now sign in to Samsung Pass using your biometric data.
If you experience issues when setting up Samsung Pass, receive errors, or see a temporarily not available message, you can try switching your network connection. Or, turn off Wi-Fi and only use Mobile data.
Use Samsung Pass
Now you can start using Samsung Pass to sign in to websites and apps.
Open Samsung Internet and navigate to your favorite website where you will need to sign into your account. After signing into your account, Samsung Pass will ask if you want to save the account information. Tap Remember. The next time you sign into the website, all you have to do is scan your biometrics instead of filling in the account information.
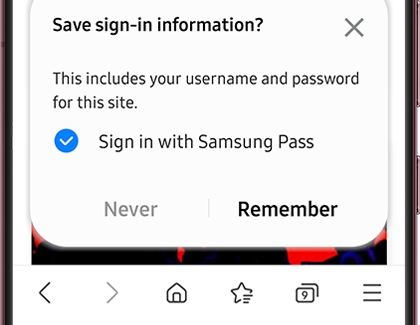
Note: Samsung Pass only works with Samsung Internet and other supported apps.
Turn Autofill on and off
If you have Samsung Pass set up, you’ll be prompted to use your biometric data when you log into one of your accounts. Here's how to use the Autofill service:
Navigate to and open Settings, then tap General management, and then tap Passwords and autofill.
Tap Autofill with Samsung Pass, and then make sure Autofill with Samsung Pass is selected.
You may also select Google; however, we highly recommend using Samsung Pass as it is powered by Samsung Knox, a defense-grade mobile security platform.
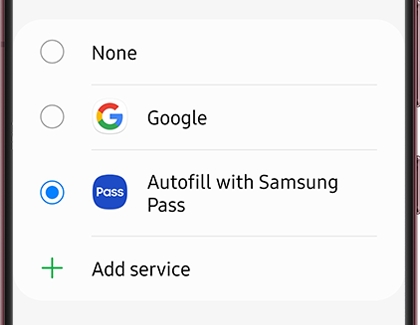
Note: To turn this service off, follow these same steps but tap None instead.
Turn Samsung Pass off
You don’t want to use Samsung Pass anymore? No problem, you can turn it off whenever you want. For security reasons, Samsung Pass will be reset to its default settings and all related data (including biometrics data) will be deleted.
From Settings, swipe to and tap Biometrics and security, and then tap Samsung Pass.
Tap More options (the three vertical dots), and then tap Settings.
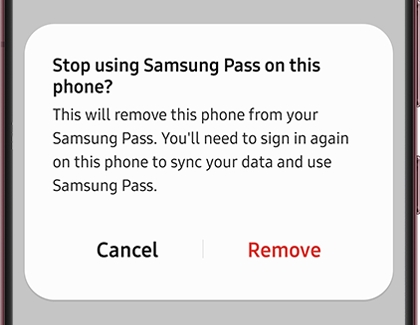
Tap See all devices using Samsung Pass, and then tap More options (the three vertical dots) next to the device you'd like to remove.
Tap Remove on the pop-up and all Samsung Pass data will be removed from that device, and Samsung Pass will be reset.
Find My Mobile
Turn on Remote controls and Remote unlock on your phone
Before you can access your phone from your computer or the Find My Mobile website, the Remote controls feature on your phone must be on.
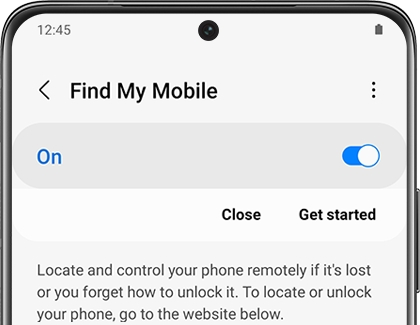
From your phone, navigate to Settings. Search for and select Find My Mobile, and then tap Find My Mobile again. Tap the switch at the top of the page. Adding a Samsung account to your phone will turn this feature on automatically, but it's always good to double-check.
You can also turn on Remote unlock from the same screen. This feature will let you unlock your phone using the Find My Mobile website if you ever forget your password. Just tap the switch next to Remote unlock, and then use the on-screen instructions to finish.
Set a Guardian for your device
Find My Mobile will allow you to set a Guardian, or a specific person, who can access your device if there's an emergency. A Guardian will be able to locate your device for you, enable Emergency mode, and monitor the device's battery life.
To set up a Guardian, first navigate to the Find My Mobile website.
Select Sign in, and then enter your Samsung account credentials. Select SIGN IN. It needs to be the same Samsung account associated with the phone or tablet.
You’ll see a map with your device’s location. To search for a different device, select it from the list on the left side.
Select Set guardians on the right. Confirm and agree to the Guardian mode information.

Select + Add new guardian, and enter their Samsung account information.
Select Verify to make sure the information is correct, and then choose Always or Custom to set the Guardian’s access. If you choose Custom, you can determine the start and end date for their access.
You can edit a Guardian by selecting Set Guardian, and then selecting Edit Guardian.
To remove a Guardian from your account, select Set Guardian, and then select Remove Guardian.
Find My Mobile requirements for your phone or tablet
In order to use Find My Mobile, these conditions must be met:
The phone or tablet must be turned on.
The device must be connected to a stable network connection.
A Samsung account must be added to your device.
Remote controls must be enabled on the device. This feature will be turned on by default when you add a Samsung account to your device.
Remote unlock must be activated in order to use the Find My Mobile unlock feature.
Thank you for your feedback!
Thank you for your feedback! Your comment has been submitted.
Continue shopping with Samsung

From $199.99 before trade-in


From $189.99 before trade-in

From $1429.99 before trade-in

From $649.99 before trade-in


From $139.99 before trade-in

From $64.99

From $177.99

From $779.99 before trade-in

From $1049.99 before trade-in

From $849.99 before trade-in


From $599


From $2199

From $879.99 before trade-in


From $1299.99


From $1099.99
Contact Samsung Support
