Installation guide for Samsung QuickDrive
Last Update date : Nov 20. 2020
To ensure proper installation of your Washing Machine and to prevent accidents when doing laundry, follow these installation guide:
Select a location
• Place on a solid, level surface without carpeting or flooring that may obstruct ventilation
• Avoid positioning the Washing Machine in direct sunlight and keep it away from heat source
• Ensure adequate room for ventilation and wiring
• The ambient temperature must be higher than the freezing point (0 ˚C)
Remove the shipping bolts
1
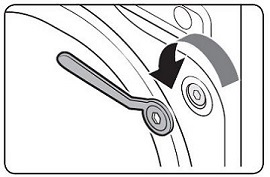
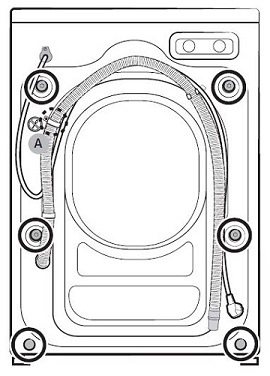
Loosen all shipping bolts on the rear of the machine using the supplied spanner
![Loosen all shipping bolts on the rear of the machine using the supplied spanner]()
2
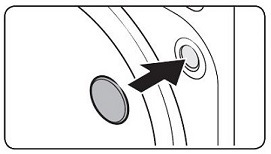
Fill the holes with the supplied plastic bolt caps
![Fill the holes with the supplied plastic bolt caps]()
Please note: Keep the shipping bolts for future use
3
Close all plastic bolt caps on the rear of the washing machine
![Loosen all shipping bolts on the rear of the machine using the supplied spanner]()
Please note: Do not remove the screw (A) that fixes the hose clip
Adjust the levelling feet
1
Gently slide the washing machine into position. Excessive force may damagethe levelling feet
2
Level the washing machine by manually adjusting the levelling feet
![Level the washing machine by manually adjusting the levelling feet]()
3
When levelling is complete, tighten the nuts using the spanner
![Tighten the nuts using the spanner]()

Connect the water hose
1
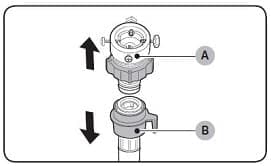
Remove the adaptor (A) from the water hose (B)
![Remove the adaptor (A) from the water hose (B)]()
2
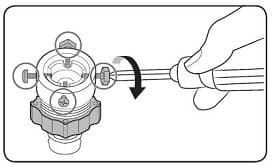
Use a Philips screwdriver to loosen four screws on the adaptor
![Use a Philips screwdriver to loosen four screws on the adaptor]()
3
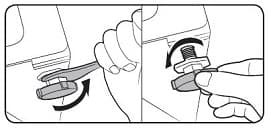
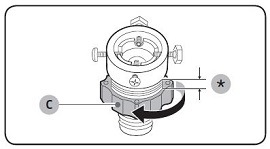
Hold the adaptor and turn part (C) clockwise to loosen it by 5 mm (*)
![Hold the adaptor and turn part (C) in the arrow direction to loosen it by 5 mm (*).]()
4
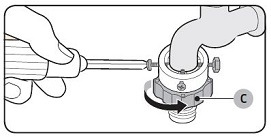
Insert the adaptor into the water tap and tighten the screws while lifting upthe adaptor
![Insert the adaptor into the water tap, and tighten the screws while lifting up the adaptor]()
5
Turn part (C) anti-clockwise to tighten it
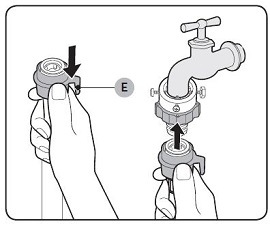
6
While holding down part (E), connect the water hose to the adaptor. Then, releasepart (E) and the hose fits into the adaptor with a clicking sound
![While holding down part (E), connect the water hose to the adaptor. Then, release part (E). The hose fits into the adaptor with a clicking sound]()
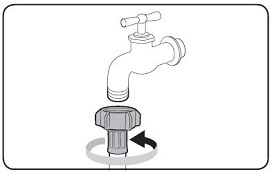
7
If the water tap is screw-type, use the correct adaptor to connect to the water tap instead
![If you are using a screw type of water tap, use the provided screw-type adaptor to connect to the water tap as shown]()
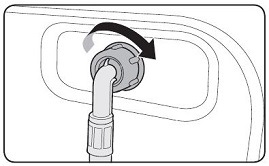
8
Connect the other end of the water hose to the inlet valve on the back of the washing machine. To tighten, turn the hose clockwise
![Connect the other end of the water hose to the inlet valve on the back of the washing machine. Turn the hose clockwise to tighten]()
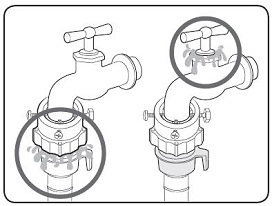
9
Open the water tap and check if there are any leaks around the connectionareas. If there are water leaks, repeat the steps above
![Open the water tap and check if there are any leaks around the connection areas. If there are water leaks, repeat the steps above]()
Position the drain hose
The drain hose can be positioned in three ways:
1
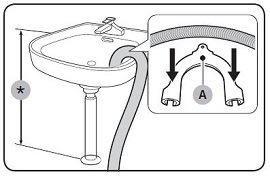
Over the edge of a wash basin
The drain hose must be placed at a height of between 60 cm and 90 cm (*) from thefloor.
To keep the spout of the drain hose bent, use the supplied plastic hose guide (A). Secure the guide to the wall using a hook to ensure stable drainage
![Over the edge of a wash basin]()
The drain hose must be placed at a height of between 60 cm and 90 cm (*) from thefloor.
To keep the spout of the drain hose bent, use the supplied plastic hose guide (A). Secure the guide to the wall using a hook to ensure stable drainage
2
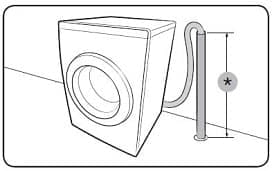
ln a drain pipe
The drain pipe should be between 60 cm and 90 cm high (*). It is advisable to usea 65 cm high vertical pipe. Make sure the drain hose is connected to the stand pipe ata slant.
Drain standpipe requirements:
• Minimum diameter of 5 cm
• Minimum carry-away capacity of 60 litres per minute
![ln a drain pipe]()
The drain pipe should be between 60 cm and 90 cm high (*). It is advisable to usea 65 cm high vertical pipe. Make sure the drain hose is connected to the stand pipe ata slant.
Drain standpipe requirements:
• Minimum diameter of 5 cm
• Minimum carry-away capacity of 60 litres per minute
3
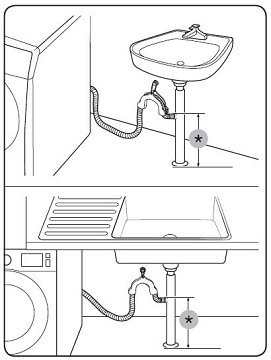
In a sink drain pipe branch
The drain pipe branch mush be above the sink siphone so that the end of the hose is at least 24 in. (60 cm) above the ground. (*)
![In a sink drain pipe branch]()
The drain pipe branch mush be above the sink siphone so that the end of the hose is at least 24 in. (60 cm) above the ground. (*)
Power on
Plug the power cord into a wall socket and press Power to turn on the Washing Machine

Thank you for your feedback!
Please answer all questions.
Samsung Members
![]()
![]()


Connect with Samsung experts, super-fans, and other Community members for tips on features and how to get the most out of your Samsung product.
Call Us
Product and App support
9am to 6pm daily
9am to 6pm daily
Repair Services
![]()
![]()


Arrange an appointment to experience a shorter waiting time.
RC01_Static Content