Fridge freezer ice maker not working - how to test & reset
Samsung refrigerators fitted with Samsung ice makers produce around 120 ice cubes a day, which is in line with most manufacturer specifications. To check how many ice cubes your refrigerator is producing, empty the freezer ice bucket and let the ice maker run for 24 hours. If you're experiencing Samsung ice maker problems and the ice maker is making no ice, there are practical solutions you can try.
Please note: If you have just installed your refrigerator, it will take 6 to 12 hours for the refrigerator to produce ice. You should throw away the first three batches of ice cubes that the ice maker produces (approximately 30 cubes) to ensure the ice maker is making ice from clean water.
_JPG$)
What to do if your ice maker is producing 50-90 cubes a day
- Lower the freezer temperature. The freezer temperature must be 0°C for the ice maker to work properly.
- Make sure that the water valve on the refrigerator water supply line is completely open. You can find the water valve at the point that your refrigerator water supply line taps into your house water line.
- If you have a water filter in your refrigerator, it may help to change the filter cartridge. Please consult your user manual for more information.
- Make sure that your freezer is not overfilled. This can reduce ice production.
How to make your ice maker produce more than 120 cubes a day
- An ice maker typically makes 1 tray of ice every 90 minutes. To shorten the amount of time the freezer takes to produce a tray of ice, lower the freezer temperature.
- If your refrigerator has a Power Freeze function, press the Power Freeze button to speed up the ice-making process. In Power Freeze mode both the compressor and the freezer fan run for 10 hours continuously. The ice-making interval will be reduced from 90 minutes to 55 minutes. If the ice bucket fills in fewer than 10 hours, then Power Freeze will stop automatically.
If you are experiencing a different issue with your ice maker, follow the steps below or refer to your user manual for more information.
Many Samsung fridge freezers featuring an ice maker have the option to turn the ice maker off. Check to make sure your freezer is set to make ice. There are four common ways to do this. Consult your user manual for device specific instructions.
For most fridge freezers:
- Press the lock button once to turn the ice maker off.
Please note: holding down this button will activate the control lock, locking the whole display, preventing buttons from being used and stopping ice production. When the lock icon is lit up the control lock is on. Hold the lock button again to disable control lock.
- Press the ice type button. Each press will change the ice type.
- Hold the ice maker button for three seconds to switch ice production on or off.
For fridge freezers with a smart screen:
- From the home screen tap fridge manager. Then tap fridge settings. Then tap the ice making switch to enable or disable ice making.

The ice maker can't dispense ice while the doors are open.
If the door is not closing properly, check to make sure that nothing is resting against the back wall of the freezer. Make sure that the door seal on the edge of the door is attached properly. You can check this by running your hand around the edge of the door to see if you can feel any cold air escaping. You can also place a sheet of paper into the door, then try to pull it out. If you can pull the sheet out without any resistance the doors are not closing properly. If you find that the door seal isn't functioning correctly it will need to be repaired or replaced.
Filling your fridge and freezer to their capacity will restrict the airflow around your items and make the appliance work harder to stay at your desired temperature.
If your freezer is too full, the icemaker may not start until your freezer reaches the correct temperature. This can cause slow ice production.
If no ice is being made or is formed incorrectly, check that your fridge is level, this can adversely affect the flow of air and water, preventing ice from forming correctly.
The levelling legs are located underneath the refrigerator at the front.
For easier access to the levelling legs on Side by Side and Four Door models, open both the doors.
If the refrigerator has a front leg cover, it might help to remove the cover first to access the levelling legs more easily. To remove the front leg cover, remove the screws with a Phillips screwdriver, and then lift it up from the bottom and pull it out.

There are two legs on the underside of your fridge/freezer for levelling and holding the appliance in place. There are also four caster wheels used for moving the refrigerator. On most level surfaces, the legs should be lowered enough so the front wheels lift off the floor.
To adjust the levelling legs, insert a flat-head screwdriver into one of the notches on the side of either levelling leg. It does not matter which one you adjust first. Use the screwdriver as a lever to rotate the levelling leg to the left. This will raise that side of the refrigerator. Repeat this on the other side until the refrigerator is as high as it can go.

Using a spirit level, make sure the refrigerator is level left to right and front to back. Make sure to check the level of the main unit and not the doors, which can be adjusted separately.
If the refrigerator is not level, determine which side is higher, and on that side, rotate the levelling leg to the right and check the level again. Continue to make adjustments until the refrigerator is level.
Make sure to level the refrigerator front to back, as the refrigerator is designed to be levelled and square. However, if your doors do not stay open and you would like them to, you can raise the legs slightly in front to slant the refrigerator backwards. Don't forget to re-install the front leg cover if you removed one.
Check if Child Lock is on. Child Lock disables the ice dispenser. When child lock is on, a small lock icon will light up.

If your fridge uses a water tank to supply water to the ice maker, make sure that it is clean and is full of water. If your fridge is plumbed into the mains water supply, follow the steps below:
To check the pressure:
- Dispense water into a measuring container for 10 seconds. You should get at least 150 ml of water. If you get less than 150 ml, your water pressure is too low. Potential causes might be a kink in the supply line or a clogged water filter. Check your water filter as explained in the next section.
Please note: The water pressure can be affected at any stage along the water system. If issues persist, try testing your water line directly by disconnecting it from the fridge and running water straight from the mains.
- If the water pressure directly from the mains is too low, a booster pump could help to increase pressure.
The water filter on your fridge / freezer makes sure that your water supply is clean and free from contaminants. We recommend that the filter is changed every six months to prevent it from being blocked. The filter icon on the display panel will let you know when it needs to be replaced. When the filter is new, the filter light may be blue, yellow, or green, depending on the model. As a reminder, the icon will turn purple when it's almost time to change the filter. After 6 months, the icon will turn red when you need to replace it. Once it's red, change it right away so you can have high-quality water.
To locate the water filter on your fridge / freezer, refer to the user manual.
Find out more about how to replace the water filter on your refrigerator.
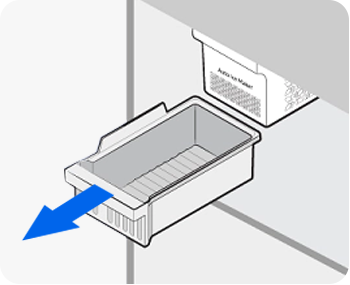
If the ice maker has not been used for a long time or if the freezer temperature is set too low, ice cubes can build-up and cause a blockage. To clear this, you should remove the ice container and check the contents.
Removing the ice container will vary depending on your model of fridge/freezer. The most common ways to remove the container are:
- Gently lift the bucket up and pull it out slowly while holding it with both hands.
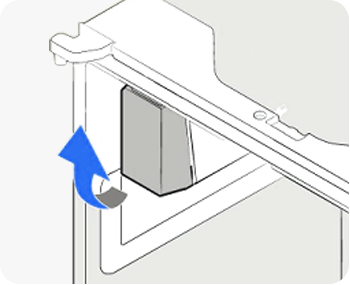
- Use the handle on the side of the bucket to remove.

- Lift the lid up and remove.
- Remove the ice bucket by pulling it out from beneath the ice maker.
If the ice in the bucket is clumped together, tip the ice into the sink. Then replace the container in the freezer to let the ice maker make a new batch of ice. If you know you won't use your ice maker for a prolonged period of time, turn the ice maker off.
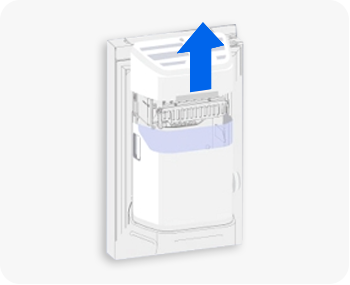
Remove your ice bucket so you can get to your ice maker.
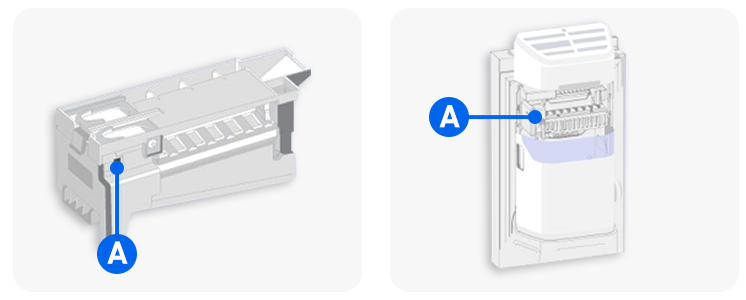
Locate the test button. It is a rectangular button that can be found in most models near the front of the ice maker, on the side or bottom. There may be writing that says TEST or an arrow pointing at it. The location will vary depending on the fridge-freezer you are using. Consult your user manual for exact locations.
Press and hold the Test button for 3 to 10 seconds. You should either hear a chime or the ice tray motor will start turning.
The test will take about 6 minutes. At the end of the test, you may hear another chime. Once it has been reset, it can take up to 24 hours for the ice maker to start creating ice again.
For exact reset steps check your user manual.
Please note: do not press the button multiple times as doing so can cause water to overflow the ice tray or ice to jam and damage the ice maker.
If ice is not dispensed frequently, it will pile up underneath the ice maker and prevent production. Shifting the ice forward may correct this problem
To maintain best function dispense ice frequently.
If the above content is unable to resolve your issue, please contact us via 0333 000 0333 or Live Chat.
Thank you for your feedback!
Please answer all questions.