Charge the battery
We discovered that more and more Galaxy users are reusing accessories they already have. Therefore, we are transitioning to the removal of the wall charger and earphones in our latest line of Galaxy devices. If you get a new phone or tablet, you will need to buy the wall charger separately. However, the inbox items will still include a USB-C cable that can be used for transferring data or for connecting an existing charger.

The Galaxy Z Fold4 and the Galaxy Z Flip4 are compatible with USB-C chargers that support USB Power delivery 3.0 or Quick Charge 2.0. They can be charged using a standard 15W charger or a Superfast 25W charger for fast charging. Samsung has used USB-C chargers on devices since 2017 – or since the Galaxy S8 and Note8. If you’ve had a Galaxy device since then, you’ll be able to use its charger.
Here are past devices with compatible chargers:
Chargers with Superfast charging
S22 and S21 series phones
Note20 series phones
S20 series phones
Note10 series phones
Z Fold 2 and Z Fold3
Galaxy A71 and A53
Note: These models can also be used with a standard 15W charger if needed.
Chargers with Adaptive fast charging
Z Fold and Z Flip series phones
S10 series phones
Note9 and Note8 series phones
S9 and S8 series phones
A70, A50, A51, A52 5G, A42 5G, A32 5G, A13, A12, and A02s
If you are a first-time Galaxy customer or do not have the charger for past devices, you can purchase a new wall charger or wireless charger from the Samsung website. Please see the third section in this article for more information on different chargers.
Charging cables and USB connection types
If you don't have a compatible charger from a previous Samsung phone or tablet, you need a replacement, or just want to have a spare, you can purchase a charger directly from Samsung. Just find your model in the following list to make sure you get the right one!
Most phones and tablets use either a USB Type C or Micro USB charger. USB Type C is the newest type of USB charger. The design helps prevent damage occurring inside the USB port because it doesn't matter which way you insert it into a phone or tablet.
If you aren't sure what model phone or tablet you have, you can check in the device's settings. Navigate to and open Settings, and then tap About phone or About tablet. Your device's name and model number will appear on this page.

Devices that use USB Type C
The latest models: Galaxy Z Flip4 and Galaxy Z Fold4
Galaxy Fold phones: Z Fold, Z Fold2, Z Fold3, Z Flip, Z Flip 5G, and Z Flip3 5G
Galaxy S phones: S8, S8+, S9, S9+, S10e, S10, S10+, S10 5G, S20 5G, S20+ 5G, S20 Ultra 5G, S21 5G, S21+ 5G, S21 Ultra 5G, S22, S22+, and S22 Ultra
Galaxy Note phones: Note8, Note9, Note10, Note10+, Note10+ 5G, Note 20 5G, and Note20 Ultra 5G
Galaxy A phones: A03s, A10e, A20, A50, A02, A12, A13, A23 5G, A32 5G, A42 5G, A71, A51, A21, A11, A01, A13 5G, A52 5G, and A53 5G
Galaxy S tablets: Tab S3, Tab S4, Tab S5e, Tab S6, Tab S7, and TabS7+
Galaxy A tablets: Tab A 10.1 (2019-2020), Tab A 10.5 (2019), Tab A 8.0 (2016-2019), Tab A 8.4 (2020), Tab A7 (2020), Tab A7 Lite (2021), and Tab A 8 (2022)
To make things a little trickier, there are different kinds of USB-C cables. If you’re unsure which USB Type C cable you have, it’s most likely a 3A or 5A cable. Both types are capable of charging your devices as well as transferring data. However, 5A cables are thicker and able to carry more power.

Devices that use Micro USB Type B
You're probably already familiar with Micro USB Type B cables. They've been used for a long time with multiple devices. The cable's head is not symmetrical. One side has ridges while the other is flat. Make sure to insert it into your phone's or tablet's USB port the correct way or it could damage the inside of your device.

Galaxy S phones: S5, S6, S6 edge, S7, and S7 edge
Galaxy Note phones: Note5
Galaxy A phones: A6
Galaxy J phones: J3 and J7 (all models)
Galaxy S and E tablets: Tab S, Tab S2, and Tab E
Galaxy A tablets: Tab A 10.1 (2016), Tab A 8.0 (2015), Tab A 7.0, and Tab A 9.7
If you've lost your Micro USB Type B charger, you can purchase a new one on Samsung.com. You can also use adapters with these cables to charge USB Type C devices.
Best practices for charging
The following tips and instructions will help you get the most out of your device's battery.
When using wireless charging accessories, please be aware that any metal or magnetic materials (e.g., coins, magnetic cards) placed between the device and the wireless charger may decrease charging efficiency or cause damage to the phone or tablet and charger.
Charging may take longer when using adapters, charging wirelessly, or charging the phone or tablet through another device like a PC.
When using wired charging accessories, always check whether any foreign objects are in the connector or plug, as they may prevent charging or cause the charging accessories to overheat.
Make sure your phone or tablet doesn't overheat. Keep it in a cool location, especially while charging.
Don't let your battery completely drain. With new lithium-ion batteries being used, it is better to keep the battery partially charged, instead of letting it die. When possible, charge your device in small amounts to keep the battery from depleting.
Note: If the power has been depleted, the battery charging indicator may take up to 10 minutes to appear on the device's screen while charging.Use a genuine Samsung fast charger for the quickest charge. You can't use the fast charging feature if you're using a standard charger.
If your phone or tablet is not charging, there are a couple of things that could be causing the problem. However, if your charger doesn't work at all, it should be replaced. If it's under warranty you can request service. If not, you will need to purchase a new one.
Turn on your device
Important: Do not use the device if the body is cracked or broken. Use the device only after it has been repaired.
You can use the Side key (which also acts as the Power key) to turn your device on and off, as well as restart it. Please see below for directions.
To power on: Press and hold the Side key to turn the device on.
To power off: Press and hold the Side and Volume down keys at the same time, and tap Power off. Tap Power off again to confirm.
To restart: Press and hold the Side and Volume down keys at the same time, and tap Restart. Tap Restart again to confirm.

To learn more about powering off your device, swipe down from the top of the screen to open the Quick settings panel, and then tap the Settings icon. Tap Advanced features, then tap Side key, and then tap How to power off your phone.
Transfer data from an old device
Wireless transfer from an Android phone
A wireless transfer is the preferred way to copy your data to a new phone. It's fast and lets you keep the phones plugged into their chargers during the transfer.
First, make sure the Smart Switch app is installed on both phones, and plug them into their chargers.
When you're ready, place the phones within 4 inches of each other.
Launch Smart Switch on both phones. Open Settings, search for Smart Switch, and then tap Bring data from old device. Tap Bring data from old device again.
Note: Alternatively, you can navigate to the Samsung folder on the Apps screen, and open Smart Switch from there.On the old phone, tap Send data, and then tap Wireless.

On your new phone, tap Receive data, tap Galaxy/Android, and then tap Wireless.
Next, complete the connection by tapping Allow on the old phone. On your new phone, choose the content you want to move, and then tap Transfer. Once the transfer is complete, tap Close on the new phone and you're good to go.

Import content from iCloud
You have lots of valuable data saved on your old iOS phone but transferring it seems like a logistical nightmare. No worries, Smart Switch makes transferring through iCloud a breeze.
On the new Galaxy phone, open Settings, search for Smart Switch, and then tap Bring data from old device. Tap Bring data from old device again.
Note: Alternatively, you can navigate to the Samsung folder on the Apps screen, and open Smart Switch from there.Tap Receive data on the new phone, and then tap iPhone/iPad.
Tap Get data from iCloud instead at the bottom of the screen.
Enter your Apple ID and password, and then tap Sign in to iCloud.

Enter the verification code, and then tap OK.
Select the data you want to transfer, and then tap Transfer. When the transfer is finished, tap Next, tap Next again, and then tap Done.

Note: iTunes music and videos cannot be transferred from iCloud. Unencrypted iTunes music can be transferred to your phone by simply copying the M4A files from a PC with your iTunes library. You can also transfer your music files directly from a PC.
Connect devices with a USB cable
Note: If you use Smart Switch via a USB OTG connection, make sure your devices are at least 20% charged to ensure a safe data transfer. The transfer may take a while, depending on the volume of multimedia data. It is recommended to fully charge your devices before beginning the transfer.
Wired transfer is best for people who don't have a lot of data on their old phone. This is because wired transfer doesn't allow you to keep your phones connected to a charger during the transfer. If you have a lot of data or years' worth of text messages to transfer, we recommend performing a wireless transfer instead.
Connect the phones with the old phone's USB cable. Most cables will require you to use a USB-OTG adapter. If you have an iPhone with a Lightning to USB-C or an Android with a USB-C to USB-C cable you won't need an adapter; it will plug right into your new Galaxy.
Launch Smart Switch on both phones. On the new Galaxy phone, open Settings, search for Smart Switch, and then tap Bring data from old device. Tap Bring data from old device again.
Note: Alternatively, you can navigate to the Samsung folder on the Apps screen, and open Smart Switch from there.On the old phone, tap Send data, and then tap Cable.
On the new phone, tap Receive data, select the type of device you're transferring from (i.e. Galaxy/Android), and then tap Cable. Smart Switch will begin scanning the old phone for transferrable content.
After the scan, select the data you want transferred to the new phone. An estimate of the transfer time will be displayed. If the transfer will take more than an hour, you may want to use a wireless transfer so both phones can be charged during the transfer.
Note: You can view the other sections in this article to learn about wireless transfers.
When you are ready to start, tap Transfer.
When finished, tap Done on the new phone, and tap Close on the old phone.
Note: A USB-OTG adapter is provided in-box with the Galaxy S10+, S10, S10e, Note10+, Note10+ 5G, and Z Flip. Newer phone models do not come with this adapter.
Use a microSD card or USB flash drive
If you have a large enough capacity microSD card or USB OTG flash drive, you can use Smart Switch to transfer your data and back up your old device to the external storage. Before you begin, insert the microSD card or USB OTG storage device into the old phone.
Launch Smart Switch on the old phone. On the new Galaxy phone, open Settings, search for Smart Switch, and then tap Bring data from old device. Tap Bring data from old device again.
Note: Alternatively, you can navigate to the Samsung folder on the Apps screen, and open Smart Switch from there.Tap the SD card icon in the upper right corner, and then tap SD card under Back up to.
Select what you want to back up. If there's not enough space on your external storage, you may need to deselect some items, but you can come back later to transfer anything that won't fit.

You can choose between Everything; Just accounts, calls, contacts, and messages; or Custom. Tap Next. If a popup message appears, select the appropriate option.
Follow the on-screen instructions. They will be very different depending on what option you chose. When it's complete, tap Done, and then remove the external storage device.
Next, insert the external storage into the new Galaxy phone, and then launch Smart Switch.
Tap the SD card icon, and then tap Restore. Select what you want to restore, and then tap Restore again.
When it's complete, tap Next, and then tap Done. You can repeat this process as many times as needed.

Note: If you connect your device to an external hard drive via an OTG cable, you can use file explorer apps (such as My Files) to copy data from the device to the external hard drive. External hard drives must be formatted as FAT or exFAT to be recognized by Galaxy devices. Some external hard drive devices require an external power supply.
Copy your data from a Windows phone
You can also use Smart Switch to transfer your data from a Windows phone.
On the new Galaxy phone, open Settings, search for Smart Switch, and then tap Bring data from old device. Tap Bring data from old device again.
Note: Alternatively, you can navigate to the Samsung folder on the Apps screen, and open Smart Switch from there.On the new Galaxy phone, tap Receive data, and then tap Windows Phone.

Next, you will see the steps to download the Smart Switch software onto your old device. Follow the on-screen prompts to continue.
Note: If your Location service is not enabled, you will be prompted to turn it on.
Once you've installed and opened Smart Switch, tap Connect on the old phone, and then select the network.
Enter the password shown on your new Galaxy phone. Your data will now be transferred.

Lock or unlock your phone
Use your device’s screen lock features to secure your device. It is recommended that you secure your device using a secure screen lock (Pattern, PIN, or Password). This is necessary to set up and enable biometric locks. By default, the device locks automatically when the screen times out.
From Settings, tap Lock screen, tap Screen lock type, and then select a screen lock type (Pattern, PIN, or Password).

Follow the on-screen instructions to set up the screen lock.
After you’ve set the lock, tap the switch next to Notifications at the top to enable notifications on the Lock screen. The following options are available for customization:
Icon only: Show only notification icons with no details on the Lock screen.
Details: Display notification details on the Lock screen.
Transparency: Adjust the desired transparency for notifications by using the slider.
Auto-reverse text color: Reverse the color of notification texts based on the current background color.
Hide content: Do not show notifications in the Notification panel.
Notifications to show: Choose which notifications to show on the Lock screen.
Show on Always On Display: Display notifications on the Always On Display screen.
Once you’ve adjusted the notification settings, return to the Lock screen settings page to configure the following screen lock options:
Smart Lock: Unlock your device automatically when trusted locations or other devices have been detected. A secure screen lock is required for this feature.
Secure lock settings: Customize your secure lock settings. A secure screen lock is required for this feature.
Always On Display: Enable the Always On Display screen.

For more information on adjusting Lock screen settings, please see our guide.
Set up voicemail
You can set up your voicemail service when you access it for the first time.
Open the Phone app, and then touch and hold the 1 key or tap Voicemail.
Follow the tutorial to create a password, record a greeting, and record your name.
Note: The options vary by carrier, but you can usually access your voicemail through the Phone app. Please contact your carrier for additional questions and information.

Navigate your phone with Gestures
Your phone’s touch screen responds best to a light touch from the pad of your finger or a capacitive stylus. Using excessive force or a metallic object on the touch screen may damage the surface of the screen, and the damage will not be covered by the warranty. Read the information below to learn about the different ways to navigate your phone and the gestures that are used.
Tap
Lightly touch items (like apps) to select or launch them.
Tap an item to select it.
Double-tap an image to zoom in or out.
Drag and drop
Touch and hold an item, and then move it to a new location.
Drag an app shortcut to add it to a Home screen.
Drag a widget to place it in a new location.
Swipe
Lightly drag your finger across the screen.
Swipe the screen to unlock the device.
Swipe to scroll through Home screens or menu options.
Touch and hold
Touch and hold items to activate them.
Touch and hold an app to display a pop-up menu of options.
Touch and hold a Home screen to customize the Home screen.
Zoom in and out
Bring your thumb and forefinger together or apart on the screen to zoom in and out.
Move your thumb and forefinger together on the screen to zoom out.
Move your thumb and forefinger apart on the screen to zoom in.
Use the on-screen keyboard
When you need to type something, text can be entered using a keyboard or your voice.
Toolbar
The toolbar provides quick access to features of the keyboard. Options may vary by carrier. Some options can always be displayed at the top of the keyboard. You can also tap Expand toolbar (the three horizontal dots) for even more options. If you'd like to customize your toolbar, just tap and hold an icon, and drag it to where you'd like it to appear.
Note: Some options will be limited by context. For example, you won't be able to insert an AR Emoji in a Google search box. You may also need to download an additional app for some options like Spotify or Bitmoji.

Emojis: Insert an emoji.
Expression: Select emojis, GIFs, AR emojis, and more.
GIFs: Add animated GIFs.
Voice input: Use Samsung voice input.
Settings: Access keyboard settings.
Handwriting: Use your handwriting to enter text. This feature is only available on phones that support the S Pen.
Search: Locate specific words or phrases in your conversations.
Translate: Type words or sentences in the keyboard to translate them into another language.
Samsung Pass: Use biometrics for secure access to apps and services.
Spotify: Add music from Spotify.
YouTube: Add videos from YouTube.
Clipboard: Access the clipboard.
Text editing: Use an editing panel to help pinpoint text that you want to cut, copy, and paste.
Modes: Select a keyboard layout.
Keyboard size: Adjust the height and width of the keyboard.
Bitmoji: Create your own personal emoji and use it in stickers.
AR Emoji: Create your own personal emoji and use it in stickers you can share.
Mojitok: Create your own stickers or insert automatically suggested ones.
Configure the Samsung keyboard
You can set customized options for the Samsung keyboard. From the Samsung keyboard, tap Settings (the gear icon) for the following options:

Languages and types: Set the keyboard type and choose which languages are available on the keyboard. To switch between languages, swipe the Space bar left or right.
Smart typing
Predictive text: See suggested words and phrases as you type.
Suggest emojis: Include emojis when using predictive text.
Suggest stickers while typing: View recommended stickers while you are typing.
Auto replace: Automatically replace what you type with predictive text recommendations.
Suggest text corrections: Underline potential grammar errors in green and suggest corrections.
Text shortcuts: Create shortcuts for frequently used phrases that will be suggested when you type the shortcut. For example, you can have your email address suggested every time you type "email".
More typing options: Customize additional typing options. You can automatically capitalize sentences, insert a space when you use predictive text, add a period when you tap the spacebar twice, or enable text prediction for all supported input languages.
Style and layout
Keyboard toolbar: View or hide the keyboard toolbar.
High contrast keyboard: Adjust the size of the Samsung keyboard and change its colors to increase the contrast between the keys and the background.
Theme: Choose a theme for your keyboard.
Mode: Choose between Portrait and Landscape view.
Size and transparency: Adjust the size and transparency of the keyboard.
Layout: Display numbers and special characters on the keyboard.
Font size: Drag the slider to adjust the font size.
Custom symbols: Change the symbol shortcuts on the keyboard.
Other settings
Swipe, touch, and feedback: Customize gestures and feedback.
Handwriting: Customize handwriting options (Galaxy S21 Ultra 5G only).
Select third-party content to use: Enable third-party keyboard features.
Reset to default settings: Return the keyboard to its original settings and clear personalized data.
About Samsung Keyboard: View the software version and legal information for the Samsung Keyboard.
Contact us: Contact Samsung Support through Samsung Members (if supported by your carrier).
Use Samsung voice input
Instead of manually typing with the keyboard, you can enter text by speaking.
From the Samsung keyboard, tap Voice input (the microphone icon) and say what you’d like to type.

To set customized options for Samsung voice input, tap Voice input from the keyboard, and then tap Settings. The following options are available:
Keyboard language: Choose the language for the keyboard.
Voice input language: Select the language for Samsung voice input.
Hide offensive words: Hide potentially offensive words with asterisks.
About Samsung voice input: View version and legal information for Samsung voice input.

Use the Phone app for calls
The Phone app allows you to make and answer calls from the Home screen, Recents tab, Contacts, and more. Contact your carrier for more information. The actual appearance of the Phone app screen varies by carrier.
Make a call
Using the keypad: From the Phone app, enter a number on the keypad and tap Call. Tap the Keypad tab if the keypad is not displayed.
Make a call from Recents: From the Phone app, tap Recents to display a list of recent calls. Select a contact, and then tap Call.
Make a call from Contacts: From the Contacts tab in the Phone app, select a contact, and then tap Call. You can also do this from the Contacts app.

Answer, decline, or end a call
When a call is received, the phone rings and the caller’s phone number or name will display. If you are using an app when a call comes in, a pop-up screen will display. You can easily answer or decline an incoming call using the provided options on the call screen or pop-up menu.
Answer a call: On the incoming call screen, drag or tap the Answer icon to answer the call.
Decline a call: On the incoming call screen, drag or tap Decline to reject the call and send it to your voicemail.
Decline a call with a message: You can choose to decline an incoming call with a text message response. On the incoming call screen, drag Send message upward and select a message, such as “I can’t talk right now.”
End a conversation: Tap End call when you are ready to hang up.
Actions while you’re on a call
You can adjust the call volume, switch to a headset or speaker, and even multitask while on a call.

Adjust volume: Press the Volume keys to increase or decrease the volume.
Switch to headset or speaker: Listen to the call using the speaker or through a Bluetooth headset (not included). Tap the Speaker icon to hear the caller using the speaker or tap the Bluetooth icon to hear the caller using a connected Bluetooth headset.
Multitask: If you exit the call screen to use another app, your active call is indicated in the Status bar.
To return to the call screen: Drag the Status bar down to display the Notification panel and tap the call.
To end a call while multitasking: Drag the Status bar down to display the Notification panel, and then tap End call.
Place a call on hold: Tap More options (the three vertical dots) and then tap Hold call. When you're ready to resume the call, just tap RESUME CALL on the phone screen.
Call log
The numbers of the calls you have dialed, received, or missed are stored in the Call log. From the Phone app, tap Recents. A list of recent calls will display. If the caller is in your Contacts list, the caller’s name is displayed.
Save a contact from a recent call
Use recent call information to create a contact or update your Contacts list.
From the Phone app, tap Recents.
Tap the call that contains the information that you want to save to your Contacts list, and tap Add to contacts.

Tap Create new contact or Update existing contact.
Enter the necessary information to create or edit the contact.
Tap Save to confirm.

Delete call records
If your Call log is getting really long, you can delete some past records from it. You can also select multiple calls and delete them all at once.
From the Phone app, tap the Recents tab.
Touch and hold the call you want to delete from the Call log. Tap Delete to confirm.
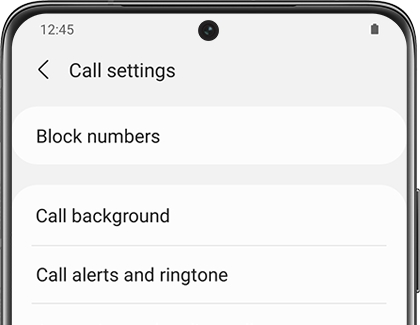
Block a number
By adding a caller to your Block list, future calls from this number are sent directly to your voicemail, and messages are not received.
From the Phone app, tap the Recents tab.
Tap the caller you want to add to the Block list.
Tap the Details icon, then tap Block, and then confirm when prompted.
Note: You can also modify your Block list in Settings. From the Phone app, tap More options (the three vertical dots), tap Settings, and tap Block numbers.
Speed dial
This feature lets you assign a contact to a number on your phone’s keypad (i.e. 2, 3, etc.). You can then dial the number by holding down the designated number on the keypad.
From the Phone app, tap Keypad, tap More options (the three vertical dots), and then tap Speed dial numbers. The Speed dial number screen displays the reserved speed dial numbers.

Tap an unassigned number.
Tap the drop-down menu (the downward arrow) to select a different Speed dial number than the next one in the sequence (i.e. 3, 4, etc.).
Number 1 is reserved for Voicemail.
Type in a name or number, or tap Add from Contacts (the person icon) to assign a contact to the number.
The selected contact is displayed in the Speed dial number box.

Make a call with Speed dial
You can make a call using Speed dial. From the Phone app, touch and hold the assigned Speed dial number in the keypad (i.e. 2, 3, etc.). If the Speed dial number is more than one digit long, enter the first digits, and then hold the last digit.
Remove a Speed dial number
If desired, you can remove an assigned Speed dial number. You can always assign another number to that shortcut later on.
From the Phone app, tap More options (the three vertical dots), and then tap Speed dial numbers.
Tap the Delete icon (the red minus sign) by the contact you want to remove from Speed dial.
Emergency calls
You can dial the emergency telephone number in your region regardless of the phone’s service status. If your phone is not activated, you can only make an emergency call.
From the Phone app, enter the emergency telephone number (911 in North America) and tap Call.
Complete your call. During this type of call, you have access to most in-call features.
Note: The emergency telephone number can be dialed even if the phone is locked, allowing anyone to use your phone to call for help in an emergency. When accessed from a locked screen, only the emergency calling feature is accessible to the caller. The rest of the phone remains secured.
Phone settings
These settings allow you to modify settings associated with the Phone app. From the Phone app, tap More options (the three vertical dots), and then tap Settings.
Place a multi-party call
You can add another number to a phone call while the call is in progress. Options vary by carrier.
From the active call, tap Add call (the plus sign) to dial the second call.
Dial the new number and tap Call. When the call is answered:
Tap Swap to switch between the two calls.
Tap the On hold number to switch between the two calls.
Tap Merge to hear both callers at once (multi-conferencing).
Video calls
Video calls use your phone's cameras to record, so you and the recipient can talk and see each other in real time!
Open the Phone app, enter a number, and then tap Google Meet call or Video call. Not all devices support video calling. The receiver has the option to accept the video call or answer the call as a regular voice call.


Real Time Text (RTT)
Type back and forth in real time with the other person while on a call. You can use RTT whenever you are calling someone whose phone also supports RTT or is connected to a teletypewriter (TTY) device. The RTT icon appears on all incoming RTT calls.
From the Phone app, tap More options (the three vertical dots), and then tap Settings.
Tap Real Time Text for the following options:
RTT call button: Choose a visibility option for the RTT call button.
Always visible: Show the RTT call button on the keypad and during calls.
Use external TTY keyboard: Hide the RTT keyboard when an external TTY keyboard is connected.
TTY mode: Choose the preferred TTY mode for the keyboard in use.
Call display while using apps
When calls are received while using other apps, they can be displayed as pop-ups. However, you can change this setting to match your preferences.
From the Phone app, tap More options (the three vertical dots), then tap Settings, and then tap Call display while using apps. The following options are available:
Full screen: Display an incoming call in the full screen Phone app.
Pop-up: Display an incoming call as a pop-up at the top of the screen.
Mini pop-up: Display an incoming call as a smaller pop-up.
Keep calls in pop-up: Enable this option to keep calls in the pop-up after they are answered.
Use Multi window
Use Multi window split screen view
With Multi window, you can have two apps open at the same time using split screen view. For example, you can use the calculator for math homework while watching watching a video.
To access Multi window, open the first app and then tap Recent, which is located to the left of the Home button, unless you've chosen to customize your navigation bar.
Tap the desired app's icon, and then tap Open in split screen view. This app will be pinned to the top window.
Note: Not all apps support split screen view.

To open a second app in the bottom window, simply open the desired app from the list.
To close one of the windows, drag the center divider bar all the way to the top or bottom of the screen until the window closes.

Foldable phones like the Z Fold and Z Flip series have extra features when it comes to Multi window! You can read about it in our guide to Multi window on foldable phones.
Exit Multi window split screen view
When you want to give Multi window a break and just use one app, you can close the split screen view.
To do this, tap the Home button. This will close them completely out on the home screen but leave them together in recents.

Add or remove Edge panels
Create an App pair
Note: The Edge panel is available only on certain device models.
Instead of separately opening apps you always use together, create an App pair. That way, those two apps will open simultaneously in split screen view. If you're using the Z Fold2, you can create an App pair with three apps.
Swipe left to open the Apps Edge panel. Touch and hold your desired app, and drag and drop it into the top portion of the screen.
Open Apps Edge again, and then select a second app. Drag and drop it into the bottom portion of the screen.
Tap the divider between the two windows to change the orientation and create an App pair:
Tap the two arrows to swap the apps’ positions.
Tap the App pair icon (it has a plus sign) to create an App pair. The App pair will be saved.
If you’d like to add a third app to the App pair, open Apps Edge again, and then drag and drop the new app into your preferred position.
Note: Adding three apps to an App pair is only available on the Z Fold2.
Once all three apps are on the screen, tap the three vertical dots in the center, and then tap the App pair icon. The three apps will be saved in a group.
Remove shortcuts from Apps Edge
Note: The Edge panel is available only on certain device models.
Maybe doing homework while playing a game isn't the best idea. Remove that shortcut to make room for a new one.
From any screen, open Apps Edge by swiping the Edge panel to the left. Tap Menu (the three horizontal lines) at the bottom, and then tap Edit. Now you can tap the minus symbol next to the shortcuts you want to remove.
You can always add the shortcut back later, or add new Edge panels with additional apps that you'd like to use.

Use Wireless power sharing
Most Qi-Compatible Samsung devices can be charged with Wireless PowerShare, but check out the full list of compatible devices just in case. The speed and power of the charge will vary by device.
Phones that can use and also be charged with Wireless PowerShare:
Galaxy S22, S22+, and S22 Ultra
Galaxy S21, S21+, and S21 Ultra
Note20 5G and Note20 Ultra 5G
Galaxy Note10, Note10+, and Note10+ 5G
Galaxy Fold, Z Fold2, Z Fold3 and Z Fold4
Galaxy Z Flip, Z Flip 5G, Z Flip3 and Z Flip4
Galaxy S20 5G, S20+ 5G, S20 Ultra 5G, and S20 FE
Galaxy S10e, S10, S10+, and S10 5G
Other devices that can be charged by Wireless PowerShare:
Galaxy Buds, Galaxy Buds2, Galaxy Buds+, Galaxy Buds Live, Galaxy Buds Pro, and Galaxy Buds2 Pro
Galaxy Watch, Galaxy Watch3, Galaxy Watch4 series, Galaxy Watch5 series, Gear Sport, and Gear S3
Galaxy S7/S7 Edge, S8/S8+, S9/S9+, Note8, and Note9
Galaxy Watch Active and Galaxy Watch Active2
Change language and input settings
Add or remove languages
You're trying to learn Spanish, but you aren't quite there yet. Add it as a language on your phone, so you can practice reading and writing in it.
Navigate to and open Settings, and then tap General Management.
Tap Language, and then tap Add language.

If you don't see the language you are looking for, tap More options (the three vertical dots), tap All languages, and then select your desired language.
Next, based on your preferences, tap Keep current or Set as default.
To delete languages, navigate to Settings, and then tap General management. Tap Language, and then tap Edit.
Note: The Edit option will not show up unless you have more than one language added.Select the language you want to delete, and then tap Remove. Tap Remove again to confirm.

Change the default language
If you're finally fluent in the language you've been studying, you can change the default language on your phone.
From Settings, tap General management, and then tap Language.
Select the language you want to be the default language.
Tap Apply to confirm. Your selected language will now become the phone's default language.

Use Emergency mode
Activate Emergency mode
When in Emergency mode, you will be able to use the Phone app to make a call to a specified contact and also to make emergency calls. You can also turn on the flashlight and sound alarms and send your location information to others in a message.
To turn on Emergency mode, swipe down from the top of the screen using two fingers to open the Quick settings panel. Tap the Power icon, and then tap Emergency mode.
If needed, enter your lock screen credentials.
Tap the checkbox to confirm you have read the Emergency mode terms and conditions, and then tap Agree.
Tap Turn on - Emergency Mode will activate.

You can also press and hold the Power and Volume down keys simultaneously, and then tap Emergency mode.
Emergency calling
Make an emergency call from the Lock screen
When something urgent is happening, you probably won't have time to unlock your device and call 9-1-1. If you have a security measure in place, like a PIN or a biometric security, you can make an emergency call right from the Lock screen. Just swipe up on your device's screen to be taken to the Lock screen, and then tap Emergency call. A dial pad will appear where you can enter your desired number. Your registered emergency contacts will also appear at the top of the screen. Finally, a Medical info icon will appear at the bottom of the screen. Tap this to show any medical information you've added to your personal contact.
Make an emergency call with no service or SIM card
In a dire situation, you can still make emergency calls even if you don't have service or a working SIM card. As long as there is a network signal nearby, your device will let you contact 9-1-1. The network doesn't even have to be your own carrier - it just needs a signal that is strong enough to put the call through. When you need to make an emergency call, dial 9-1-1 the way you normally would.
Make a call while in Emergency mode
The Home screen in Emergency mode will only display the apps and functions you absolutely need. This includes the Phone app and the Emergency call option.
Tap the Phone app to access all of your contacts, so you can still make a call to family members and friends. The Keypad is also available if you need to dial a new number.
Tap Emergency call at the bottom of the Home screen to dial 9-1-1. Tap Yes to activate the call.

Turn off Emergency mode
When you no longer need to worry about battery life, it's time to turn Emergency mode off.
Tap More options (the three vertical dots), and then tap Turn off Emergency mode.

Thank you for your feedback!
Thank you for your feedback! Your comment has been submitted.
Continue shopping with Samsung
From $199.99 before trade-in
From $209.99 before trade-in

From $1429.99 before trade-in
From $509.99 before trade-in
From $64.99
From $1199.99 before trade-in
From $779.99 before trade-in
From $969.99 before trade-in
From $899.99 before trade-in
From $499.99 before trade-in

From $949.99 before trade-in
From $419.99 before trade-in
From $849

Contact Samsung Support