How do I use the Gallery app on my Galaxy device?

The Gallery app is the perfect place to organise all of your videos and photos. Everything you capture from the camera on your phone will automatically be saved to the gallery, but you can also add in or download photos so that you can store all of your memories in the same place.


If you want greater control over how your images and videos look, the Gallery has a full suite of editing options from filters and stickers to colour tools and background music.


The Gallery app can connect to the Samsung Cloud, making it really easy to share your unforgettable moments across all of your devices. You can also create shared albums so that all of your loved ones can follow along with your adventures, no matter where you are in the world. 

How do I use the Gallery app on my Galaxy device?

Want to quickly see all your photos from last years unforgettable holiday? Albums help you to categorise all your photos and videos so that you can easily keep everything in order. Some albums may be created or suggested for you automatically but you can also create your own albums.
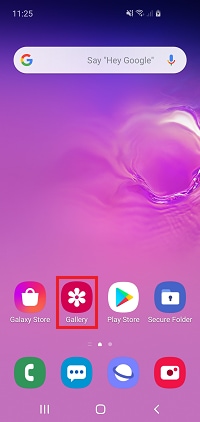
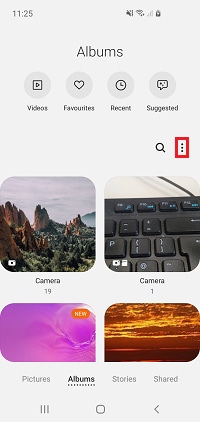
1 Open the Gallery app
Open the Gallery app
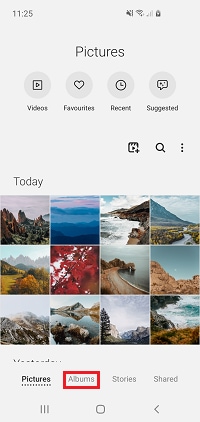
2 Tap Albums
Tap Albums
3 Tap the options icon. It looks like three dots
Tap the options icon
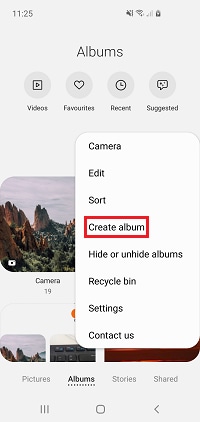
4 Tap Create album
Tap Create album
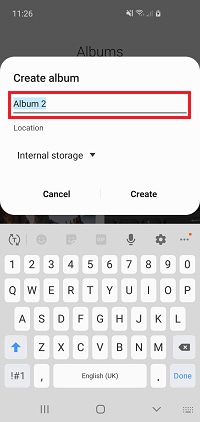
5 Give your album a name
Give your album a name
6 Choose where you want to save your album. You can choose between the internal storage and SD card

Please note: you will only be able to choose where to save the album if you have an SD card in your device
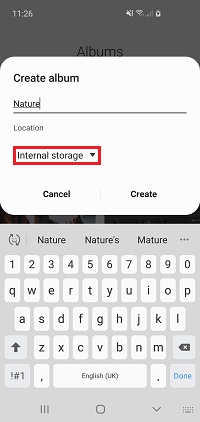
Choose where you want to save your album
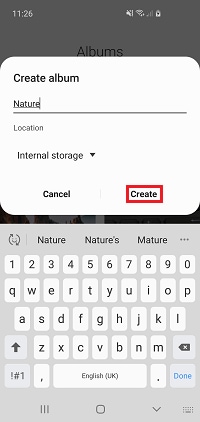
7 Tap Create
Tap create

Your album will be added to the Albums section.
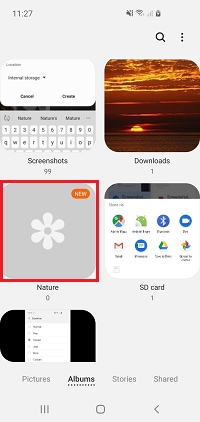
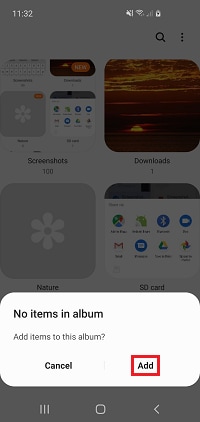
8 Tap on your new album
Tap on your new album
9 Tap Add
Tap add
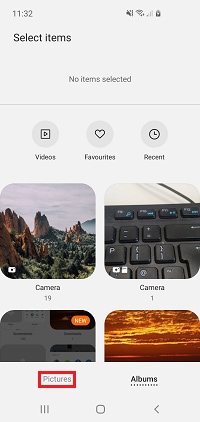
10 Tap Pictures
Tap Pictures
11 Tap on each picture that you would like to add to the album
Tap on each picture you want toadd to the album
12 Tap Done
Tap Done
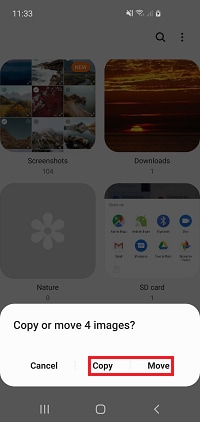
13 Choose whether you would like to Copy or Move your pictures. Copying your pictures will save a second version of the image to your album. Moving your pictures will send the original image file to the album
Choose whether you want to copy or move your images

If you've added an image accidentally or no longer want an image in your album you can delete it.
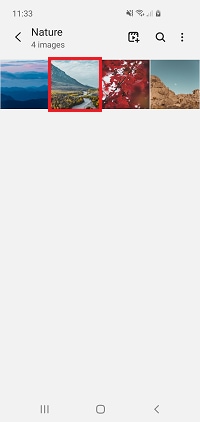
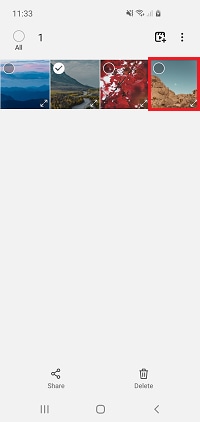
14 Press and hold the image you want to remove
Press and hold the image you want to remove
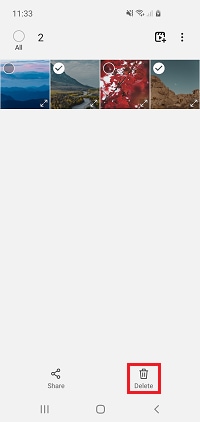
15 If you want to delete more than one image, tap each image that you want to delete
Tap on each image you want to delete
16 Tap Delete
Tap Delete

Stories give you everything you need to enhance your images and create something even more shareable. You can use stories in a similar way to albums, helping you to organise you image and videos but you can also use stories to turn your images into collages and GIFs.

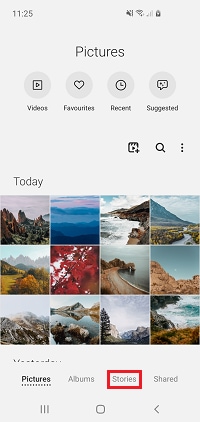
1 Open the Gallery app
OPen the Gallery app
2 Tap Stories
Tap Stories
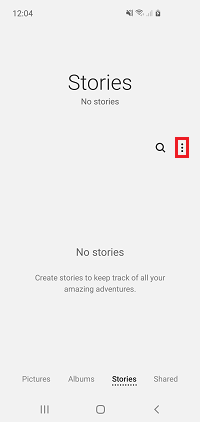
3 Tap the options icon. It will appear as three dots
Tap the options icon
4 Tap Create story
Tap Create story
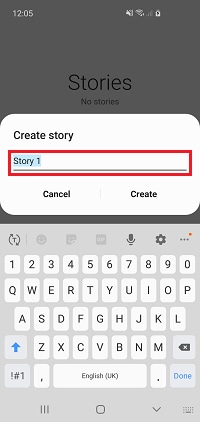
5 Give your story a name
Give your story a name
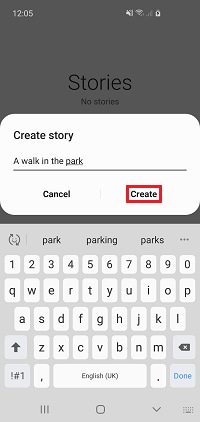
6 Tap Create
Tap create
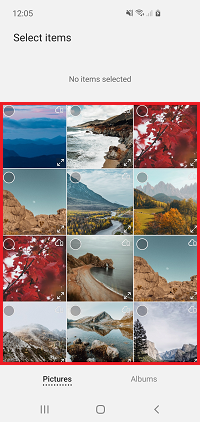
7 Tap on the photos and videos that you want to add to your story
Tap on the photos and videos you want to add to your story
8 Tap Done to add the media to your story
Tap Done to add the media to your story

Your story will be added to the Stories section of the Gallery app but you can continue adding or removing images.
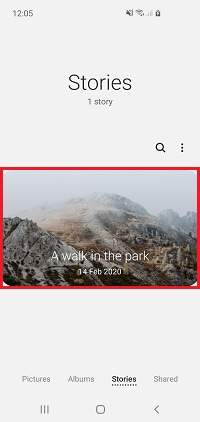
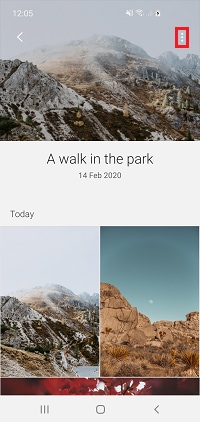
9 Tap your story
Tap your story
10 Tap the options icon
Tap the options icon
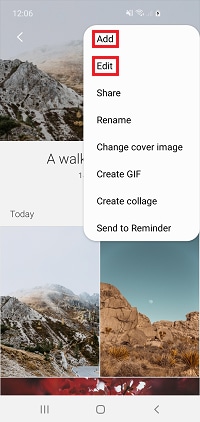
11 Tap Add to add more images to your story. Tap edit if you'd like to remove an image from your story
Tap Add to add more images to the story or tap edit to remove images from the story

If you'd like to make your media even more interesting you can turn it into collages or GIFs.


Making a GIF

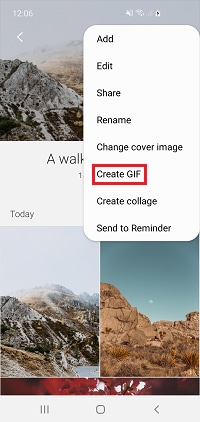
1 Open your story and tap the options icon
Tap the options icon
2 Tap Create GIF
Tap Create GIF
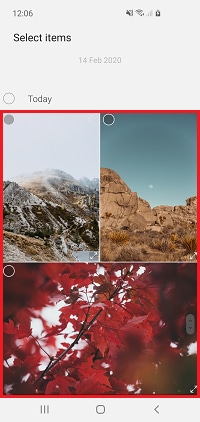
3 Tap the images you want to use. You can add up to 50 images
Tap the images you want to use
4 Tap Create GIF
Tap Create GIF
5 Use the tools along the bottom if you'd like to edit your GIF. You can change the ratio, speed and direction of the GIF and you can also add decorations
Use the tools along the bottom to edit your GIF
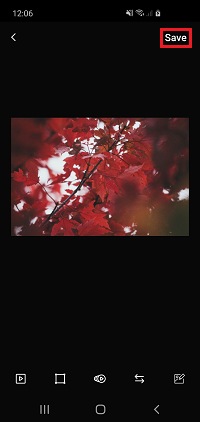
6 Tap Save once you are happy with your GIF
Tap save once you're happy with your GIF

Making a collage

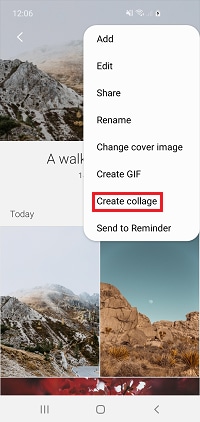
1 Open your story and tap the options icon
Tap the options icon
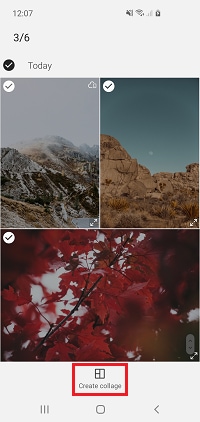
2 Tap Create collage
Tap Create collage
3 Tap the images you want to use. You can select up to six images
Tap the images you want to use
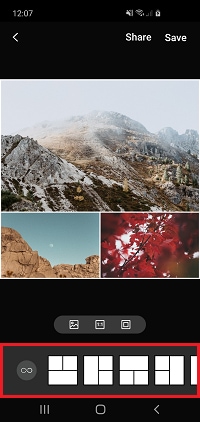
4 Tap Create collage
Tap create collage
5 Scroll along the bottom to select a layout for your collage
Select a layout for your collage
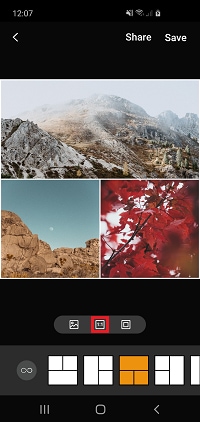
6 Tap the ratio button to change the aspect ratio
Tap the ratio button to change the aspect ratio
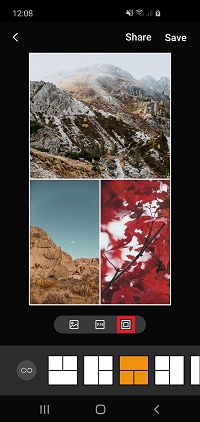
7 Tap the border icon to change the colour, width and style of the border
Tap the border icon to adjust the appearance of the border
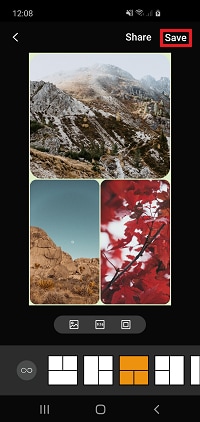
8 Tap Save once you are happy with your collage
Tap Save once you are happy with your collage

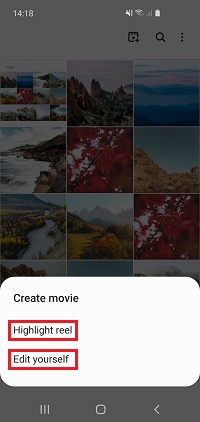
Want to make sharing your favourite snaps a little more interesting? Movies let you piece together images and videos into a moving sequence. Creating a movie couldn't be easier. You can choose to have the Gallery app create a highlight reel, or you can edit the media together yourself to have complete creative control.


This feature has previously been called video collage and stories.

1 Open the Gallery app
Open the gallery app
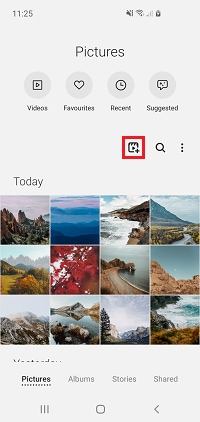
2 Tap the create movie icon
Tap the create movie icon
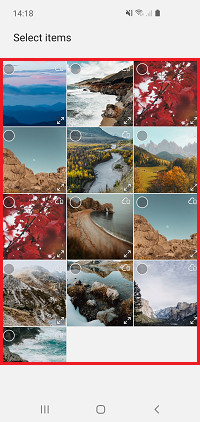
3 Tap the photos and videos that you would like to add to your movie
Tap the photos and videos you want to add
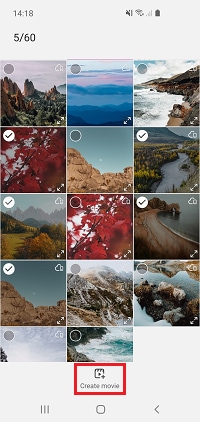
4 Tap Create movie
Tap Create movie
5 Tap Highlight reel or Edit yourself
Tap highlight reel or edit yourself

Your Galaxy device can take incredible photos and videos that you will want to share with your friends and family. The Gallery app makes sharing your content super easy through any of your preferred apps.

1 Open the Gallery app
open the gallery app
2 Tap and hold an image or video that you want to share
Tap and hold any image or video you want to share
3 If you want to share more than one image or video, tap each image or video that you want to share
Ta each image or video you want to share
4 Tap Share
Tap Share
5 Tap the app that you want to use to share your media
Tap the app you want to use to share your media
6 The final steps to share your media will differ depending on the app you have chosen. Follow any on-screen instructions and steps to finish sharing

The Gallery app will automatically assign tags to many of your photos by analysing what is in the image. This can help you sort through your photos, create an album of similar images or search for a specific photo. If a tag has been assigned incorrectly or you want to give a photo a new tag you can do so through the options.

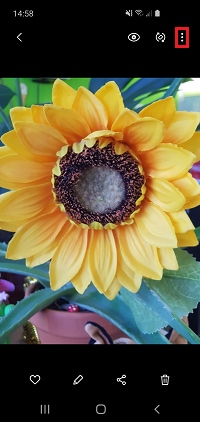
1 Open the photo you want to tag
Open the photo you want to tag
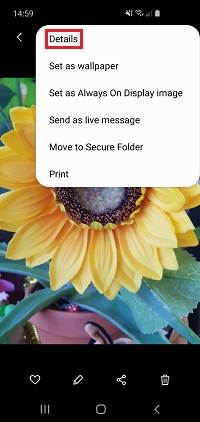
2 Tap the options icon
Tap the options icon
3 Tap Details
Tap details
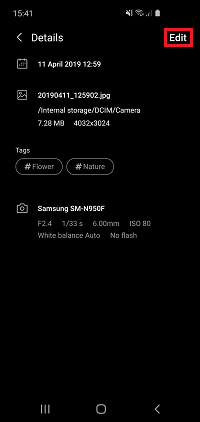
4 Tap Edit
Tap edit
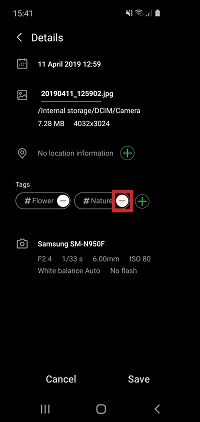
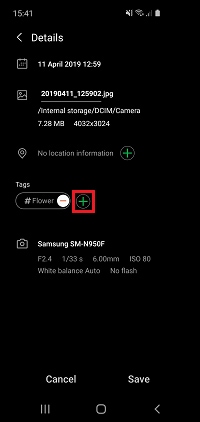
5 Tap the - icon to remove a tag
Tap the - icon to remove a tag
6 Tap the + icon to add a tag
Tap the + icon to add a tag
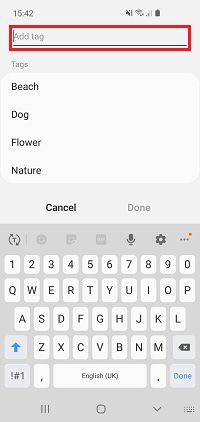
7 Enter the tag you want to use
Enter the tag you want to use
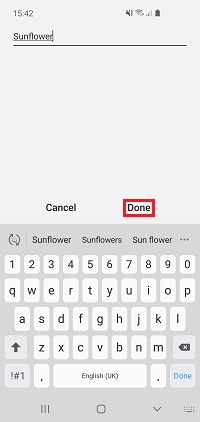
8 Tap Done
Tap Done
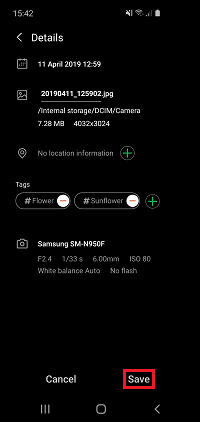
8 Tap Save
Tap Save

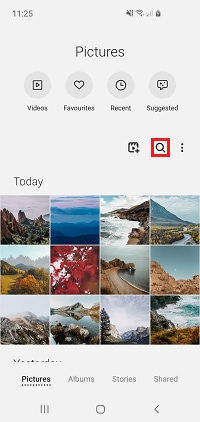
The search function on your Galaxy device takes the needle out of the haystack and places it straight into your hand. You can use the search in the Gallery app to quickly find specific photos and videos. Search will automatically organise some of your media in different categories but you can also search for specific tags, the location you took the picture or what is in the image. 

1 Open the Gallery app
Open the Gallery app
2 Tap the search icon. You can do this from any section of the Gallery app
Tap the search icon

Some of your content will be automatically categorised.
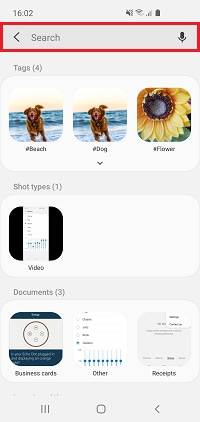
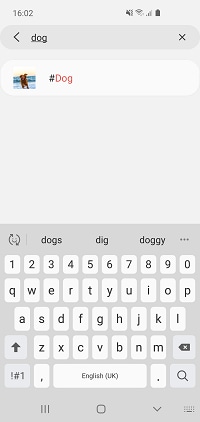
3 Tap the searchbar
Tap the searchbar
4 Enter the most appropriate keyword. This will differ depending on the picture you are trying to find. For example, if you wanted to find a picture of a dog on the beach some appropriate keywords could be dog, animal or beach
Enter the most appropriate keyword
5 As you're typing your keyword, the search feature will automatically look through your files and identify anything appropriate. If this keyword doesn't return the image you are looking for, try using a different one
How do I use the Gallery app?

The days of passing around a photo album to your family and friends may be gone but you can still share all your favourite photos and videos with your loved ones. Your friends and family can see all the content that you add to a shared album on their own device, helping you keep connected.

1 Open the Gallery app
Open the Gallery app
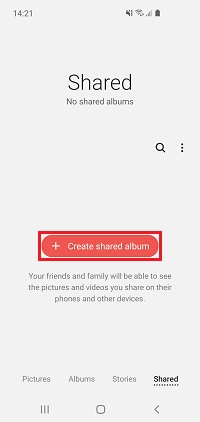
2 Tap Shared
Tap Shared
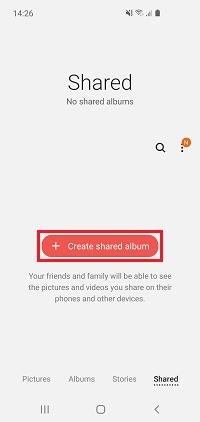
3 Tap + Create shared album
Tap +Crete shared album
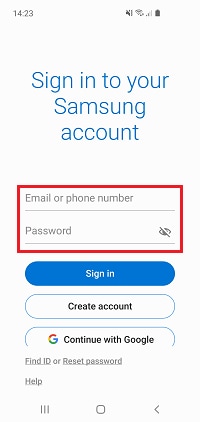
4 Sign into your Samsung account if you haven't already
If you haven't already, sign into your Samsung account
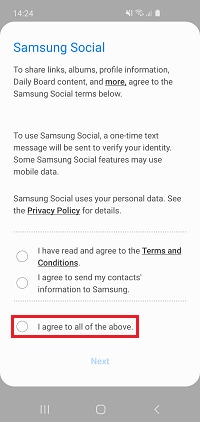
5 Tap I agree to all of the above to agree to the terms and conditions of Samsung Social
Tap I agree to all of the above
6 Tap + Create shared album
Tap +Create shared album
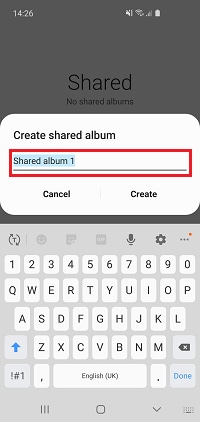
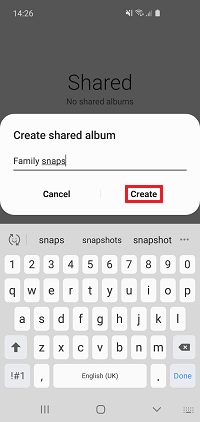
7 Give your shared album a name
Give your shared album a name
8 Tap Create
Tap Create
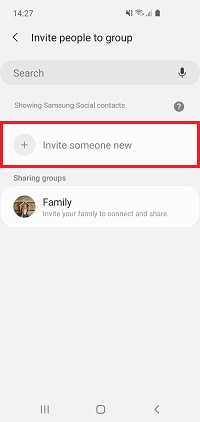
9 Tap Invite someone new or select a member of your Samsung Social contacts
Tap Invite someone new
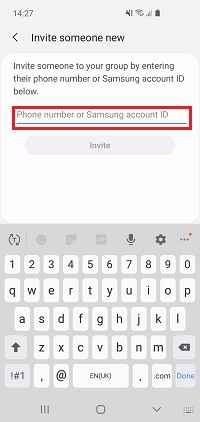
10 Enter the phone number or Samsung account ID of the person you want to view your shared album
Enter the phone number or Samsung account ID of the person you want to share the album with
12 Once your contact has accepted the invitation, you can use your shared album in a similar way to a regular album, by adding photos and videos. Just remember that anything added to the shared album will be visible to anyone you have invited to view it

The cloud keeps all your devices connected, making sure that all of your files can be accessed no matter what you are using and where you are. You can sync your photos from the Gallery so that you can easily view them across all your devices.

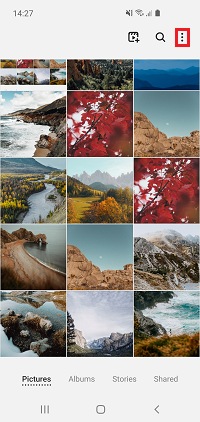
1 Open the Gallery app
Open the Gallery app
2 Tap the options icon
Tap the options icon
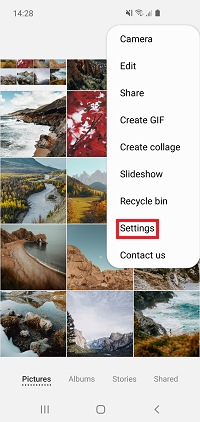
3 Tap Settings
Tap Settings
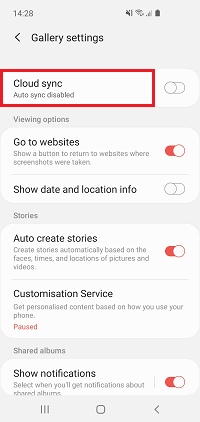
4 Tap Cloud sync
Tap Cloud sync
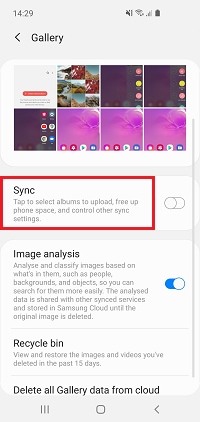
5 Tap Sync
Tap Sync
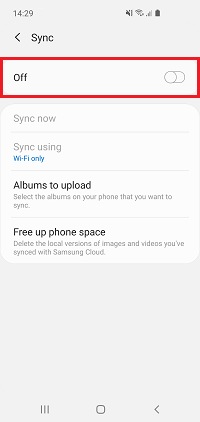
6 Tap the switch to turn syncing on
Tap the switch to turn on syncing
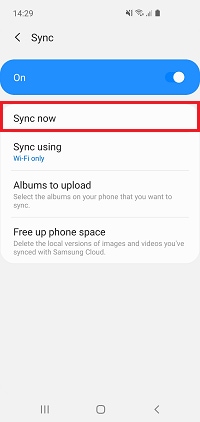
7 Tap Sync now to sync your gallery
Tap Sync now to sync your gallery
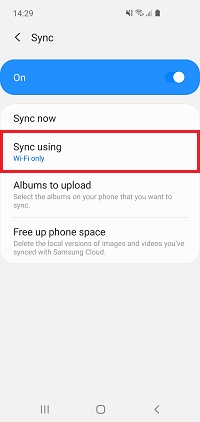
8 Tap Sync using to control when syncing occurs. You can choose between Wi-Fi only and Wi-Fi or mobile data
Tap Sync using
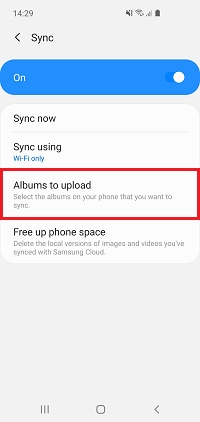
9 Tap Albums to upload to choose which albums you want to sync to the cloud
Tap albums to upload to choose which albums you want to sync
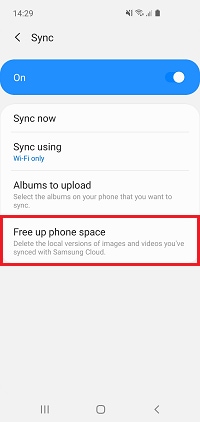
10 Tap Free up phone space to delete the images and videos from your device once they have been uploaded to the cloud
Tap Free up phone space to delete images and videos from your device once they have been uploaded to the cloud

There are loads of different ways that you can send a photo from your device. Using email, Bluetooth or the cloud is great for sending one or two photos but it can become a pain if you want to transfer your entire gallery. 


The easiest way to send a group of photos at once is by connecting to your PC with a USB cable. Find out in detail how to transfer photos from your device to PC with a USB cable.


Usually, when you delete a photo it is gone forever, however, you can turn on a recycle bin that will hold your deleted items for 15 days. Perfect for when you have a change of mind. You will have to turn on the recycle bin before it can be used.

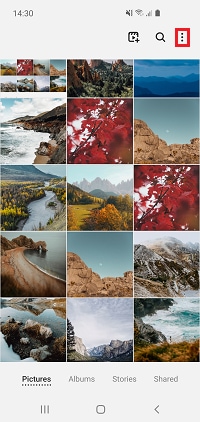
1 Open the Gallery app
Open the Gallery app
2 Tap the options icon
Tap the options icon
3 Tap Recycle bin
Tap Recycle bin
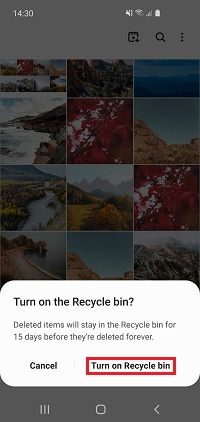
4 Tap Turn on Recycle bin
Tap Turn on Recycle bin

The recycle bin has now been turned on. Any deleted images will be stored in the recycle bin for 15 days before they are permanently deleted.

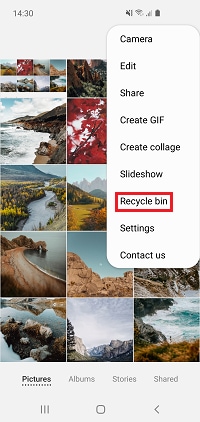
5 To see the recycle bin, tap the options icon
Tap the options icon
6 Tap Recycle bin
Tap Recycle bin
How do I use the Gallery app?

Editing your photos and videos

Your Galaxy device takes amazing pictures, but did you know that there is also a full suite of editing tools in the gallery app to help your bring your pictures to life? There is a huge range of options including filters, stickers, doodles and colour spot. Find out how to use the photo editing tools in detail below.

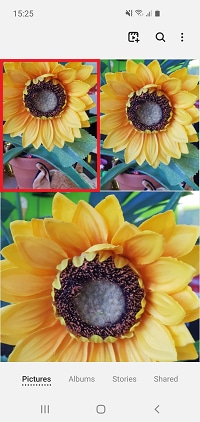
1 Open the Gallery app
Open the Gallery app
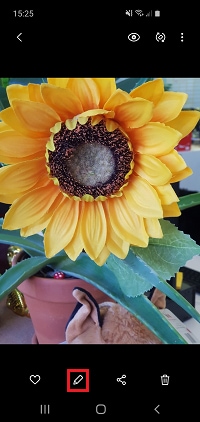
2 Tap the photo you want to edit
Tap the photo that you want to edit
3 Tap the edit icon. It looks like a pencil
Tap the edit icon
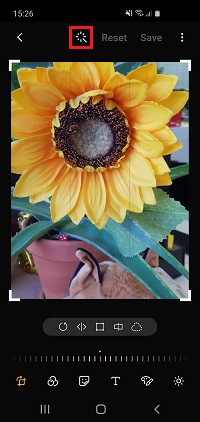
4 If you want to edit your photo manually, skip to step 5. If you want Samsung's intelligent software to edit your photo, tap the auto adjust icon
To edit your photo automatically, tap the auto adjust icon

A number of editing tools will appear at the bottom of the screen. 
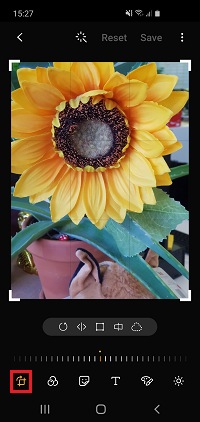
5 If you would like to change the size of the image and how it appears, tap the transform icon
Tap the transform icon
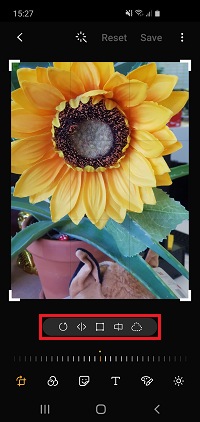
6 Transformation tools will appear under your image. From left to right they are rotate, flip horizontally, ratio, perspective and lasso. Tap on the tool you want to use to adjust your image
Tap on the tool that you wish to use
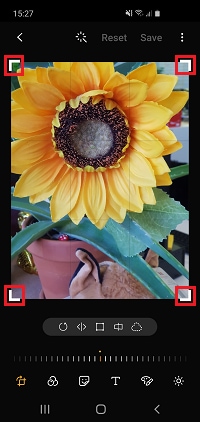
7 To crop your image, begin dragging it from any corner. Release the corner once you are happy with how your image has been cropped
Drag the image from a corner to crop it
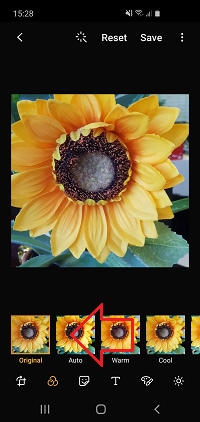
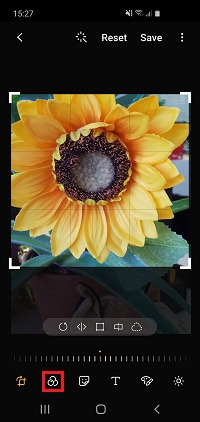
8 If you would like to apply a ready made filter to your image, tap the filters icon
Tap the filters icon
9 Swipe along the filters at the bottom of the screen to find your preferred option. Each filter will change your image in a different way
Swipe along the filters to find your preferred option
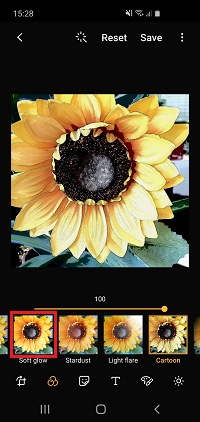
10 Tap on a filter to select it. It will immediately be applied to your image
Tap on a filter to select it
11 If you would like to swap to a different filter, tap on the filter you want to use
If you would like to use a different filter, tap on it
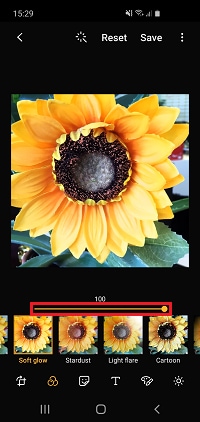
12 To adjust how intensely the filter adjusts your image, drag the slider. The filter will be at the maximum intensity by default
Drag the slider around to adjust the intensity of the filter
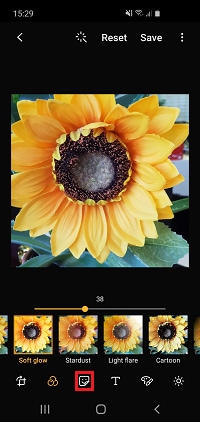
13 If you would like to customise your image with stickers, tap the sticker icon
Tap on the sticker icon
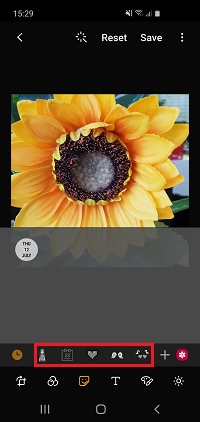
14 Your downloaded sticker packs will appear at the bottom of the screen. Tap on each sticker pack to search through them
Your sticker packs will appear at the bottom of the screen. Tap on each sticker pack to search through them
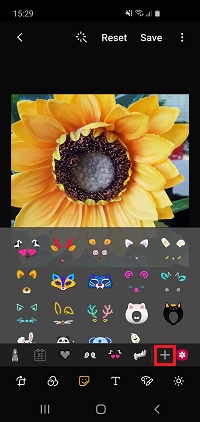
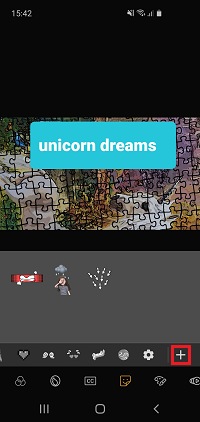
15 Tap the + icon if you would like to download additional sticker packs

Please note: there may be additional charges to download some sticker packs

Tap the + icon to download additional sticker packs
16 If you'd like to create your own sticker from an image in your gallery, tap the gallery icon
Tap the Gallery icon to turn a image from your gallery into a picture
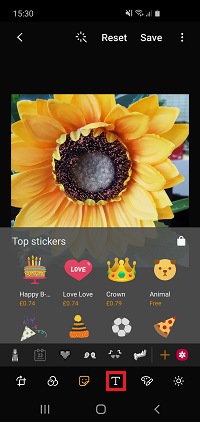
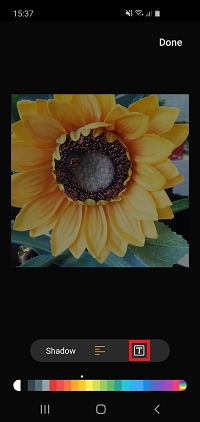
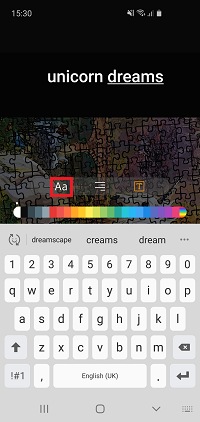
17 If you would like to add some text to your image, tap the text icon
Tap the text icon
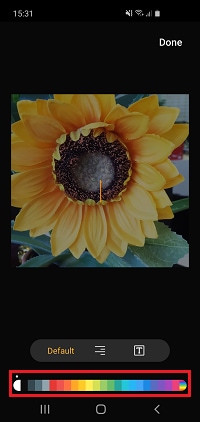
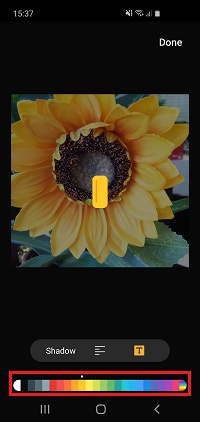
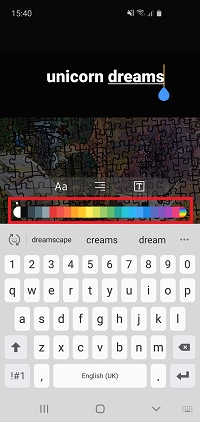
18 To change the colour of the text, slide your finger across the colour chart. Release your finger when your preferred colour appears
Slide your finger across the chart chart to change the colour of the text
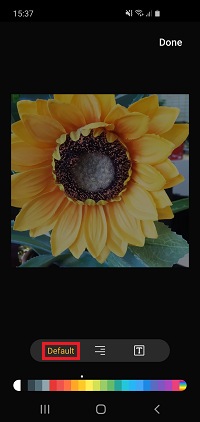
19 Tap the font style to cycle through the selection of available fonts
Tap the font style to cycle through the available fonts
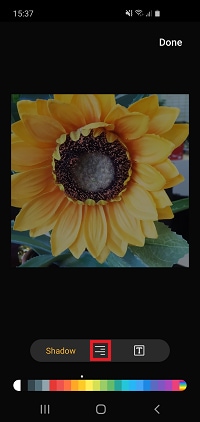
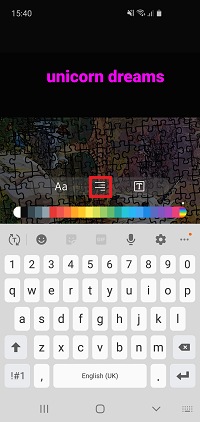
20 To change the position of your text, tap the alignment icon. You can choose from centre, right and left
Tap the alignment icon to change the alignment of your text
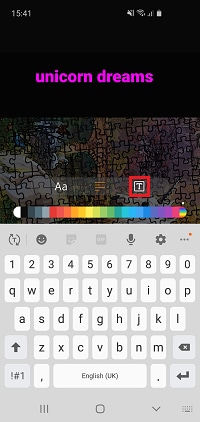
21 To apply a background colour to your text, tap the background icon
Tap the background icon to apply a colour to your text
22 While the background tool is selected, slide your finger across the colour chart to change the background colour. Release your finger when your preferred colour appears
Slide your finger across the colour chart to change the colour of the background
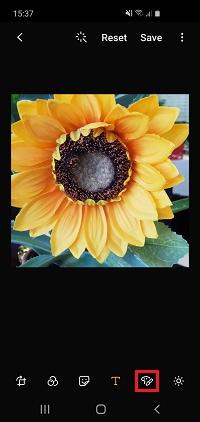
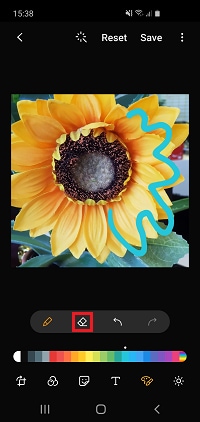
23 If you would like to customise your image by drawing on it, tap the draw icon. It looks like a paint palette
Tap the draw icon to doodle on your image
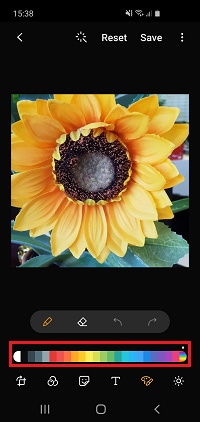
24 You can change the colour of the pen by sliding your finger across the colour chart. Release your finger when your preferred colour appears. You can use your finger to draw on the image
Slide your finger across the colour chart to change the colour of the pen
25 If you would like to manually erase some of your drawing, tap the eraser icon
Tap the eraser icon if you'd like to erase some of your doodle
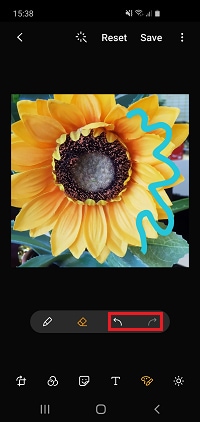
26 You can also tap the undo and redo icons to reverse or return your last action
You can also tap the undo and redo buttons to reverse or return your last action
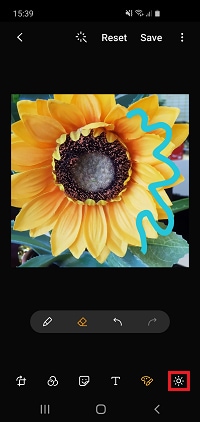
27 To manually adjust the colour of your image, tap the tone icon
Tap the tone icon
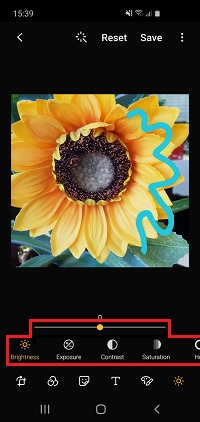
28 The following tone tools will appear, brightness, exposure, contrast, saturation, hue and white balance. Tap the tool you want to use then drag the slider left or right to change the intensity
Tap the tool you want to use, then drag the slider to adjust the intensity of the tool
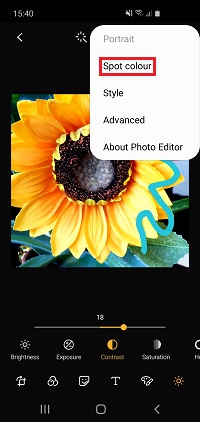
29 If you'd like to further customise your image, tap the options icon
Tap the options icon
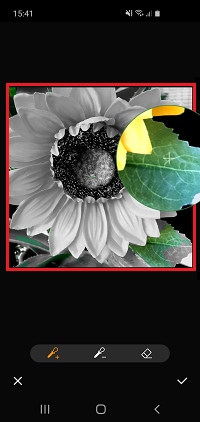
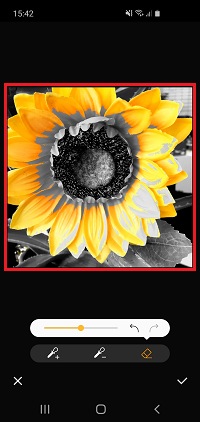
30 Tap Spot colour.Spot colour lets you highlight parts of an image by keeping certain parts in colour while the rest is greyscale
Tap spot colour to control what colours appear on your image
31 Hold your finger on the image. A magnified area will appear. Hold your finger over the colour that you want to highlight, then release
Hold your finger over the colour you want to highlight. Release your finger to apply the spot colour
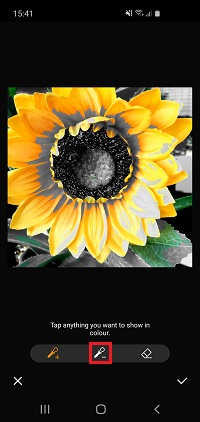
32 If you would like to get rid of some colour, tap the remove colour icon
Tap the remove colour icon
33 Hold down your finger on the screen in the same way as adding colour to remove it
Move you finger in the same way as adding colour to remove it
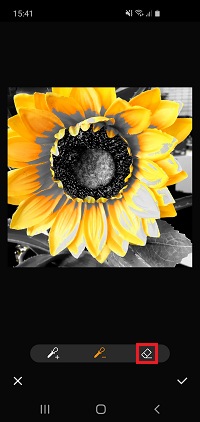
34 If you would like to manually remove some colour, tap the eraser icon
Tap the eraser icon
35 Drag your finger over the image to remove colour
Drag your finger across the screen to remove the colour
36 Once you are happy with your adjustments, tap the tick icon to apply your changes
Tap the tick icon  to apply your changes
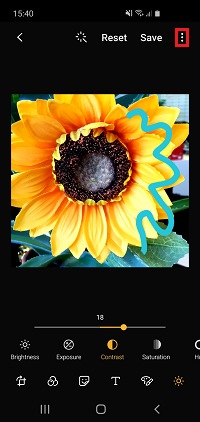
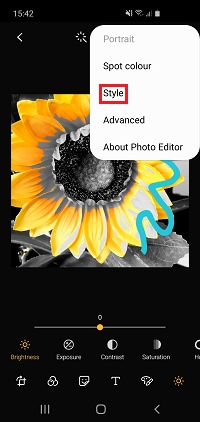
37 To see more photo editing features, tap the options icon
Tap the options icon
38 Tap Style
Tap Style
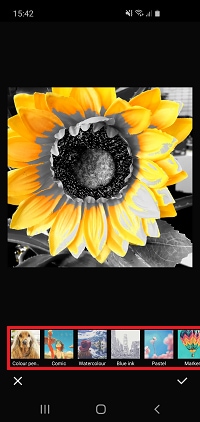
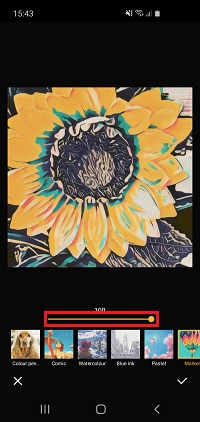
39 Tap the image style you want to use. The available options are colour pencil, comic, watercolour, blue ink, pastel, marker, line art, oil paint, cubist and pen and wash
Tap the image style you want to use
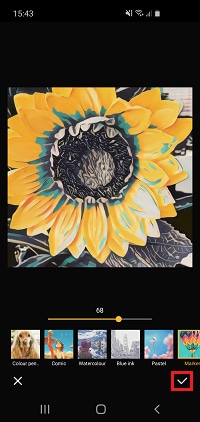
40 Drag the slider left or right to adjust the intensity of the style
Drag the slider to adjust the intensity of the style
41 Tap the tick to apply your changes
Tap the tick icon to save your changes

Your Galaxy device is a portable editing station, giving you all the tools you need to piece together great videos wherever you are. Using the in-built editor, you can trim videos, apply captions, change the speed and loads more. Find out how to use the video editing tools in detail below.

1 Open the Gallery app
Open the Gallery app
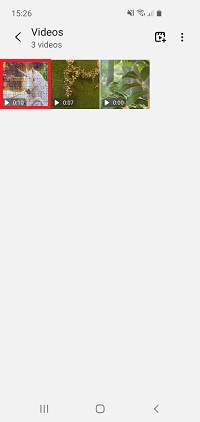
2 Tap the video you want to edit
Tap on the video you want to edit
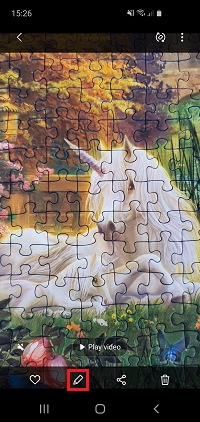
3 Tap the edit icon. It looks like a pencil
Tap the edit icon
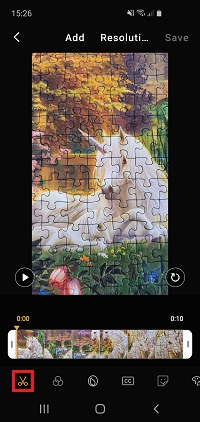
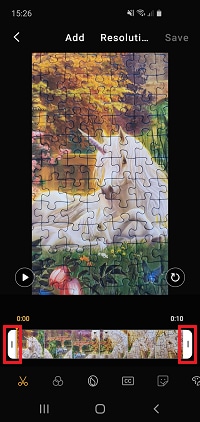
4 The editing tools will appear and trim will be selected. Trim gives you control over the length of your video
The editing tools will appear and trim will be selected
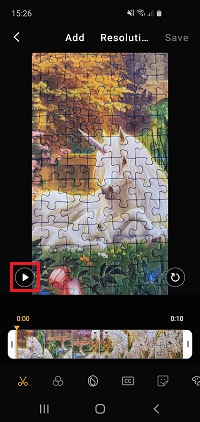
5 You can tap the play button at any time to watch your video and see your changes
Tap the play button at any time to watch your video
6 Using the handles, drag your video from either end to trim it
Drag your video from either end to trim it
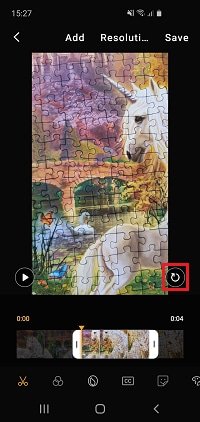
7 You can tap the rotate button at any time to rotate your video
Tap the rotate button at any time to rotate your video
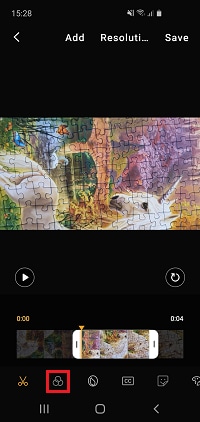
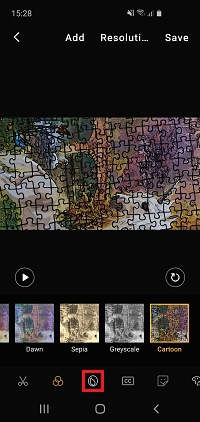
8 If you would like to change how your video looks you can use a filter. To get started, tap the filters icon
Tap the filters icon
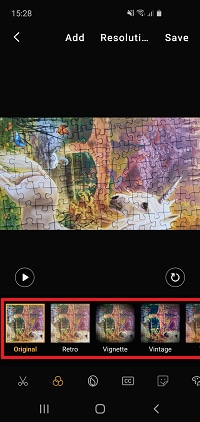
9 Tap the filter that you want to apply. The available options are original, retro, vignette, vintage, tint, dawn, sepia, greyscale and cartoon
Tap the filter that you want to apply to your video
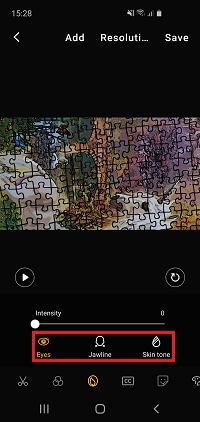
10 If you would like to change how faces in your video appear, tap the beauty icon
Tap the beauty icon
11 Tap the beauty tool that you want to use. The options are eyes, jawline and skin tone

Please note: beauty tools will only work if a face can be detected in your video

Tap the beauty tool that you would like to use
12 You can adjust the intensity of your selected beauty tool by dragging the slider left or right
Drag the slider left or right to adjust the intensity of the selected tool
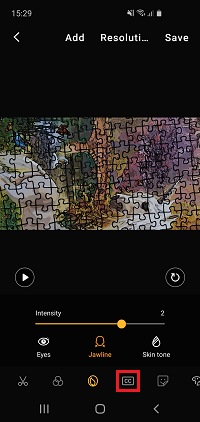
13 If you would like to add text to your video, tap the caption icon
Tap on the caption tool
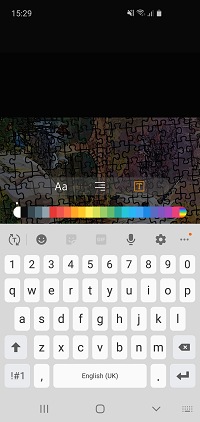
14 Enter your caption using the on-screen keyboard
Enter the caption you want to use
15 Tap the font style icon if you would like to change the font. Tapping the font icon will bring up all available fonts
Tap the font style to change the font
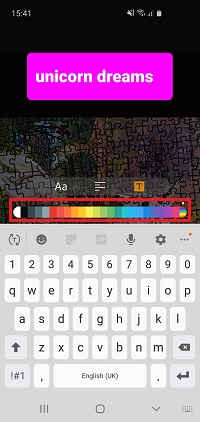
16 If you would like to change the colour of your text, slide your finger across the colour chart. Release your finger when your preferred colour is displayed
Slide your finger across the colour chart to change the colour of your text
17 Tap the alignment icon to scroll through the available text alignments. You can choose from left, centre and right
Tap the alignment icon to cycle through the text alignment options
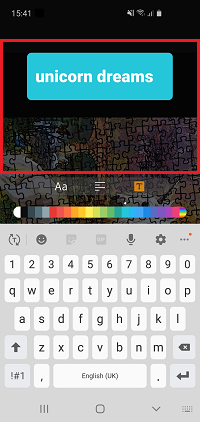
18 If you would like to give your text a background colour, tap the background icon

Please note: applying a background colour will change your text colour to white

If you'd like to give your text a background, tap the background icon
19 While background is selected, slide your finger along the colour chart to change the background colour. Release your finger when your preferred colour is displayed
Slide your finger across the colour chart to change the colour of the text background
20 Once happy with the text and style of your caption, tap on the screen above the caption tools to minimise them
Tap the area above the caption tools to minimise them
21 If you would like to change the position of your caption you can drag it around your video
Drag your caption around to change its position
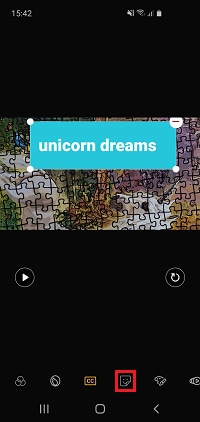
22 If you would like to customise your video with an image, tap the stickers icon
Tap on the stickers icon to add a sticker to your video
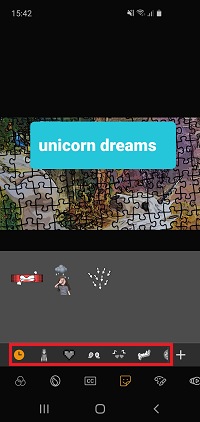
23 Your downloaded sticker packs will appear at the bottom of the screen. Tap on each sticker pack to search through them
Your downloaded sticker packs will appear at the bottom. Tap on them to search for the sticker you want to use
24 If you can't find a sticker you want to use, tap the + icon to download additional sticker packs

Please note: downloading some sticker packs may incur additional charges
Tap the + icon to download additional sticker packs
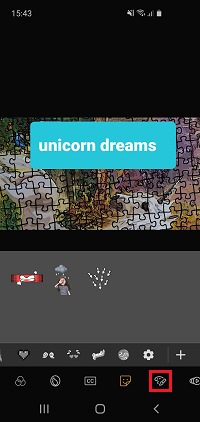
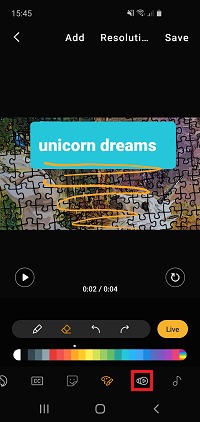
25 If you would like to doodle onto your video, tap the draw icon. It looks like a paint palette
Tap the draw icon
26 If you would like to change the colour of the pen, slide your finger across the colour chart. Release your finger when your preferred colour is displayed
Slide your finger across the colour chart to change the colour of the pen
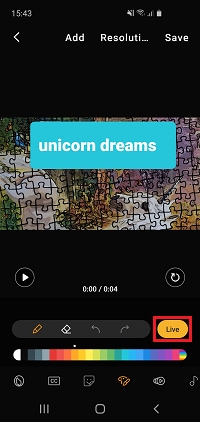
27 When drawing on a video you can choose to use a live drawing or static drawing. A live drawing will show your doodle being crated in real time while a static drawing will only show the finished drawing. Tap the Live button to switch between these modes
Choose between a live and static drawing by tapping the live button
28 If you have made a mistake you would like to erase, tap the Eraser icon. You can now swipe across your error to erase it

Please note: if you are creating a live drawing, erasing a mistake will also be shown live
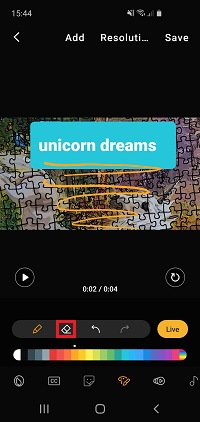
Tap the eraser icon if you want to erase some of the drawing
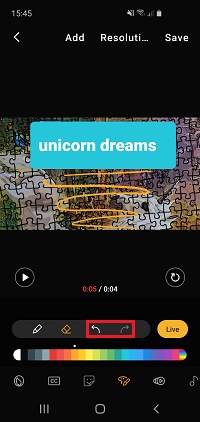
29 You can also tap the undo and redo icons to reverse or return your last action
You can also tap the undo and redo buttons to reverse or return your actions
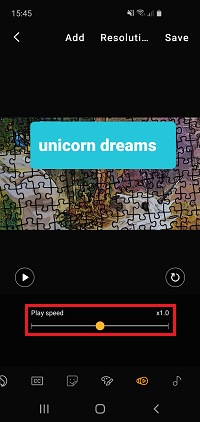
30 If you would like to change the speed of your video, tap the speed icon
Tap the speed icon if you want to change the speed of your video
31 Drag the slider left or right to change the speed of the video. You can choose from x0.5, x1.0 and x2.0 speeds
Drag the slider left or right to change the speed of your video
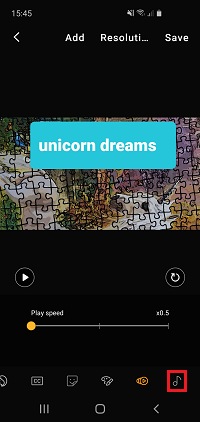
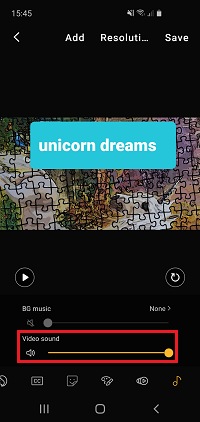
32 To change how loudly your video will play, tap the video sound icon
Tap the video sound icon
33 Drag the slider to adjust the volume of your video
Drag the slider to adjust the volume of your video
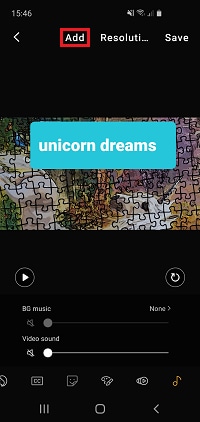
34 If you would like to add another clip or image into your video, tap Add
Tap Add, to add another video or image to your video
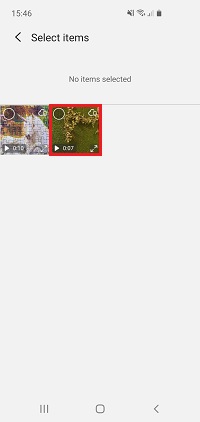
35 Tap on the video(s) or image(s) that you want to add
Tap on the video(s) or image(s) that you would like to add to your video
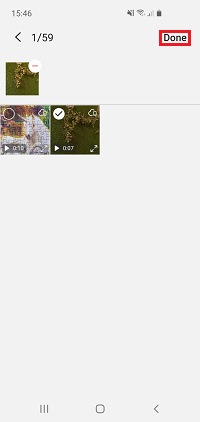
36 Tap Done to add your selection
Tap Done to add your videos
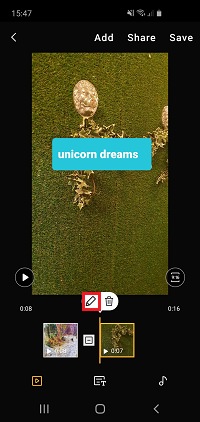
37 If you would like to edit one of the added videos, tap on the thumbnail of the video you want to edit
Tap you the video you just added if you would like to edit it
38 Tap the edit button and follow steps 5 - 34 to edit your video
Tap the edit button and follow the previous steps to edit the video
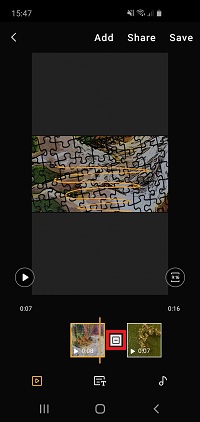
39 If you would like all your clips to flow together you can add transitions. To get started, tap the transition box
Tap on the transition box
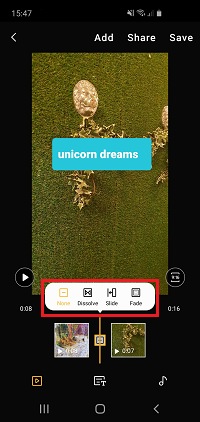
40 Tap on the type of transition that you'd like to use. The available options are dissolve, slide and fade
Tap on the type of transition you want to use
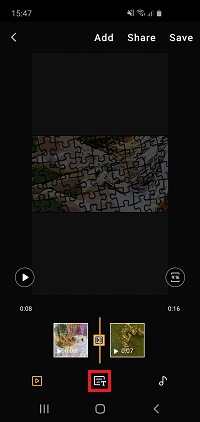
41 If you would like to give your video a title or description, tap on the title icon
Tap on the title icon
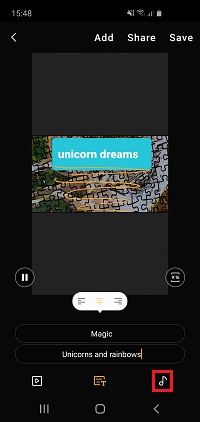
42 Give your video a Title and Description. These will briefly appear on your video before fading out
Give your video a title and description
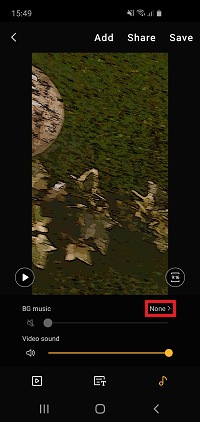
43 If you want to change the volume of your video or add some background music, tap the audio icon
Tap the audio icon to adjust the volume of your video
44 Tap None to add some background music
Tap None to add some background music
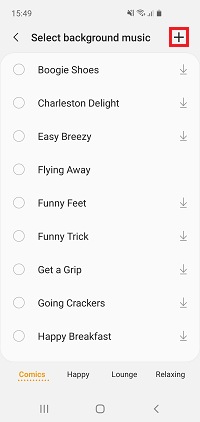
45 Select from the pre loaded background music or tap the + icon to use your own
Tap n the + icon to use your own music. Or tap one of the pre loaded selections
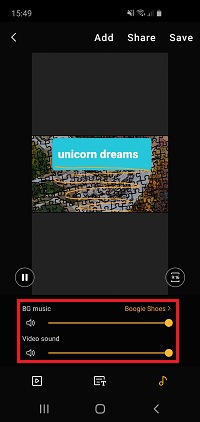
46 Drag the volume sliders to adjust the volume for your background music and video
Drag the volume slider to adjust the volume for your background music and video
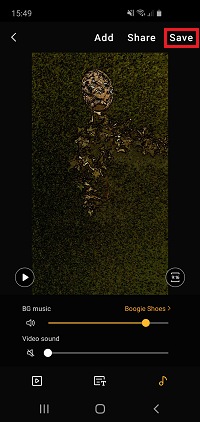
47 Once you're happy with your video, tap Save
Tap Save once you're happy with your video

If you're experiencing unusual behaviour on Samsung mobiles, tablets or wearables, you can send us an error report or ask us a question in the Samsung Members app.


This allows us to take a closer look at what is happening. The data is anonymised and only held for the duration of the investigation. Find out more about sending an error report through the Samsung Members app.


Thank you for your feedback!