Connecting to a wireless LAN with Windows 10
Browsing, streaming, gaming. Many things that we do on our laptops is better with the internet. Find out how to connect the computer to the internet wirelessly without using a separate LAN cable.
Please note: the feature may not be supported on all models.
Connecting to a wireless LAN on Windows 10
1
Click Notifications at the bottom right of the taskbar.
![Click Notifications at the bottom right of the taskbar]()

2
Open Network
![Open Networks]()

3
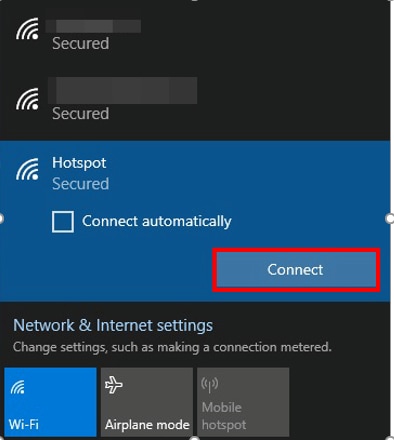
Select the network you plan to use from the list of wireless networks found, then click Connect.
![Select the network you want to use, then click connect]()
Please note: if you select Connect automatically before connecting, the PC will reconnect to the same network later, even after restarting without any separate connection process.
4
If the network is secure, enter the password, then click Next to connect to the network.
![Enter the password, then click Next to connect]()
Please note: you will be automatically connected to networks you have previously connected to.

Turning off the wireless LAN on Windows 10
1
Click the Wi-Fi icon at the bottom right of the taskbar.
![Click the Wi-Fi icon at the bottom right of the taskbar]()

2
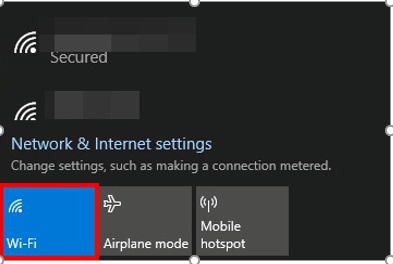
Click Wi-Fi at the bottom to disable wireless LAN.
![Click Wi-Fi at the bottom to disable wireless LAN]()
Please note: if, after trying the steps above, you are still experiencing issues connecting to a wireless LAN you can run the Network troubleshooter found in Settings > Network & Internet.
Connecting to a wireless LAN on Windows 11
1
Click on the Network icon at the bottom right of the taskbar.
![Network icon selected]()
2
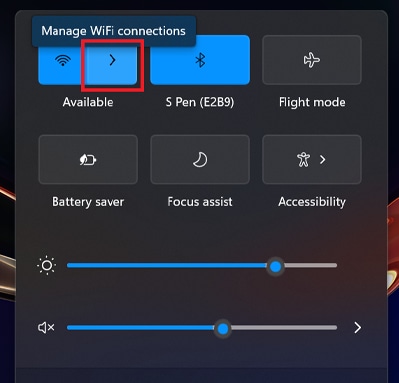
Select the arrow next to the Wi-Fi icon, which says ‘Manage WiFi connections’ when you hover over it.
![Arrow next to wifi connection selected]()
3
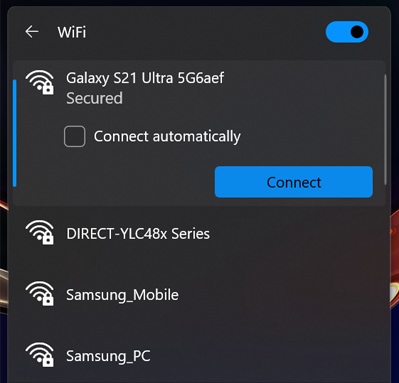
Select the network you wish to connect to, and click Connect. If you want to automatically reconnect to this network in the future, select the ‘Connect automatically’ checkbox.
![Select wifi network and click connect]()
4
If the network is secure, enter the password, and select Next to connect.
![Enter password and click next to continue]()

Turning off the wireless LAN on Windows 11
1
Click on the Network icon at the bottom right of the taskbar.
![Network icon selected]()
2
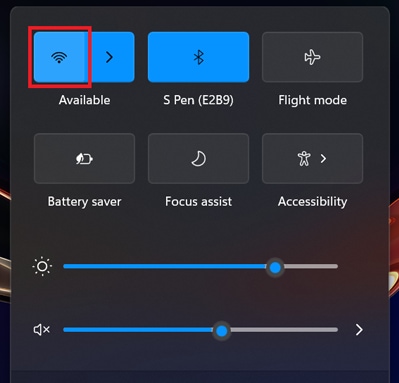
Select the WiFi icon in the top left of the menu.
![Wifi icon selected]()
3
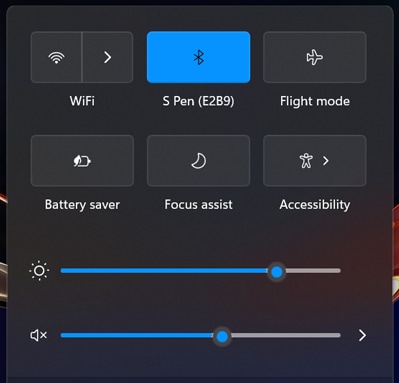
If the wireless LAN is disabled, the button will be greyed out.
![Wireless LAN switched off]()
Thank you for your feedback!
Please answer all questions.