Manage display settings on your Samsung Galaxy

Navigate through the myriad of display settings on your Samsung Galaxy device to dramatically enhance your viewing experience. Adjust the brightness for comfort, switch to dark mode for nighttime use or fine-tune the refresh rate for smoother visuals. Each setting plays a pivotal role in optimizing your interaction with the device. This article provides a comprehensive guide to all the display options available, including screen modes and the navigation bar. Discover how to tailor your Samsung Galaxy's display to suit your personal preferences and daily needs, ensuring each interaction is as enjoyable as it is visually appealing.
Note: The information provided applies specifically to mobile devices sold in Canada. Screen availability and settings options may vary depending on your wireless service provider, software version and device model.
Switching to dark mode transforms your device’s menus, settings, and built-in Samsung applications into a visually relaxing dark theme. This feature can help reduce eye strain in low-light conditions and adds a sleek, modern aesthetic to your user experience.


Step 1. Open the Settings menu. Then, navigate to and tap Display.


Step 2. Tap Dark to activate dark mode.


Step 3. Tap Light to disable dark mode.
Notes:
- Tap Dark mode settings to access scheduling options. Here, you can set dark mode to automatically activate between sunset and sunrise, or customize the schedule by setting specific start and end times.
- While dark mode applies a darker palette to Samsung's native apps and interface, third-party apps may retain their original themes unless they are designed to support dark mode.
- Dark mode may not function as intended if you are using a downloaded theme, a high contrast font or with certain third-party apps.
Activate dark mode to give your device’s interface a sleek, dark theme that reduces eye strain in low-light conditions and enhances aesthetic appeal.


Step 1. Place two fingers slightly apart at the top of your screen and swipe down to open the Quick settings panel.


Step 2. Tap Dark mode to enable the feature.


Step 3. Tap Dark mode again to disable the feature.
Notes:
- While dark mode applies a darker palette to Samsung's native apps and interface, third-party apps may retain their original themes unless they are designed to support dark mode.
- Dark mode may not function as intended if you are using a downloaded theme, a high contrast font or with certain third-party apps.
Adjusting the screen brightness on your Samsung Galaxy not only improves visibility depending on your environment but also helps conserve battery life. Follow these simple steps to find the perfect brightness level for your device, whether manually or automatically.


Step 1. Open the Settings menu. Then, navigate to and tap Display.


Step 2. Tap and hold the slider handle under “Brightness” and drag left to dim or right to brighten.


Step 3. Check the switch next to “Adaptive brightness”. If it's off, tap to turn it on to enable automatic brightness adjustment.
Learn more about Adaptive brightness on your Samsung Galaxy: Adaptive brightness is a feature that automatically adjusts your screen's brightness based on the lighting around you. It also learns your preferences over time, so if you typically adjust your screen brighter or dimmer in certain light conditions, your mobile device will start doing this for you. It helps make the screen easier to see and can save battery life.
Easily tweak the brightness of your Samsung Galaxy's screen right from the Quick Settings for immediate comfort and better battery efficiency. These steps allow you to quickly adjust the light levels to suit any setting, ensuring optimal readability and device performance.


Step 1. Place two fingers slightly apart at the top of your screen and swipe down to open the Quick settings panel.


Step 2. Tap and hold the brightness slider handle, then drag it left to decrease or right to increase the screen brightness.


Step 3. Tap the More options icon (three vertical dots) to access additional brightness settings.


Step 4. Check the switch next to “Adaptive brightness”. If it's off, tap to turn it on to enable automatic brightness adjustment.
Learn more about Adaptive brightness on your Samsung Galaxy: Adaptive brightness is a feature that automatically adjusts your screen's brightness based on the lighting around you. It also learns your preferences over time, so if you typically adjust your screen brighter or dimmer in certain light conditions, your mobile device will start doing this for you. It helps make the screen easier to see and can save battery life.
On those super sunny days, it might seem impossible to see your phone’s screen, even at maximum brightness. But with newer Galaxy models, you have a secret weapon: Extra brightness. This feature boosts your screen’s brightness beyond the usual limits, making it ideal for clear visibility even in bright environments.
Notes:
- The Extra brightness feature is available only on select newer Galaxy models (such as the Galaxy Flip5, Galaxy S22, Galaxy S23, Galaxy S24 and Galaxy S25 series) and may vary by carrier and software version.
- The Extra brightness feature is accessible only when Adaptive brightness is disabled.
- Keep in mind that using Extra brightness can significantly increase battery consumption. It's best used sparingly to conserve battery life.


Step 1. Open the Settings menu. Then, navigate to and tap Display.


Step 2. Tap the switch next to “Adaptive brightness” to turn off this feature.


Step 3. Tap the switch next to “Extra brightness” to turn on this feature.
Note: Even with the Extra brightness feature enabled, you can still manually adjust the brightness level from the Display settings menu or directly from the Quick Settings panel for tailored screen visibility.
A refresh rate is how often your mobile device’s screen updates its image each second, measured in Hertz (Hz). For example, a 60 Hz refresh rate means the screen refreshes 60 times per second. Higher rates, such as 120 Hz, allow the screen to respond and refresh faster, making everything look and feel smoother when you use your device.
For mobile gamers, a higher refresh rate reduces game lag and stuttering, ensuring animations are smoother, especially in fast-paced online games. Additionally, movies and videos with lots of movement appear more fluid and realistic.


When it's time to dive into your favorite first-person shooter or binge-watch your favorite show, adjusting your device's refresh rate can enhance your experience. This setting, known as Motion Smoothness on Samsung Galaxy, optimizes visual fluidity for the best performance.


Step 1. Open the Settings menu. Then, navigate to and tap Display.


Step 2. Tap Motion smoothness.


Step 3. Select your desired option.


Step 4. Tap Apply to confirm the new setting.
Notes:
- Use Standard to set your device to a 60 Hz refresh rate. This option conserves battery life optimally.
- Adaptive dynamically adjusts the screen refresh rate up to 120 Hz, providing high refresh rates when needed and conserving battery life in less demanding situations.
- High locks the refresh rate at 120 Hz on select models, consuming more battery but ensuring the smoothest experience. This setting is not available on all devices.
- Some devices do not support a 120 Hz refresh rate at WQHD+ resolution and will automatically switch to Standard when this resolution is selected.
- When Power Saving Mode is enabled, the screen will automatically set to Standard refresh rate.
You can adjust the display tone of your device to Vivid for richer colours or Natural for softer hues, tailoring the screen to your viewing preferences.


Step 1. Open the Settings menu. Then, navigate to and tap Display.


Step 2. Tap Screen mode.


Step 3. Tap Vivid or Natural based on your preference.
Notes:
- Natural mode adjusts the screen to a natural tone, ideal for those who prefer less saturated colours.
- Vivid mode optimizes the colour range, saturation, and sharpness of your display, enhancing visual impact.
- Adjustment of display colour in Vivid mode is exclusive to this setting (see the next sections).
- Vivid mode may not be fully compatible with some third-party apps.
You can optimize your display colours by fine-tuning the white balance when using Vivid mode. Adjust the screen mode to a cooler or warmer colour tone to suit your preferences.


Step 1. Open the Settings menu. Then, navigate to and tap Display.


Step 2. Tap Screen mode.


Step 3. Ensure Vivid is selected. If it is, adjust the slider under White balance to shift the display tone to cooler or warmer.
Notes:
- Adjustment of display colour in Vivid mode is exclusive to this setting.
- Dragging the slider towards Cool increases the blue colour tones.
- Dragging the slider towards Warm enhances the red colour tones.
If you want to adjust your display in more detail when using Vivid mode, you can modify the Red, Green or Blue values individually in Advanced settings. This allows you to increase or decrease specific tones to fine-tune the display according to your preferences.


Step 1. Open the Settings menu. Then, navigate to and tap Display.


Step 2. Tap Screen mode.


Step 3. Ensure Vivid mode is selected. If so, tap Advanced settings.


Step 4. Adjust the R (Red), G (Green) or B (Blue) colour sliders according to your preference. The screen tone will adjust accordingly.
Note: Adjustment of display colour in Vivid mode is exclusive to this setting.
The classic Navigation bar features the Recents, Home, and Back buttons prominently at the bottom of your Galaxy device's screen. This setup is the default navigation method on all Galaxy phones and tablets. Each button has a specific function:
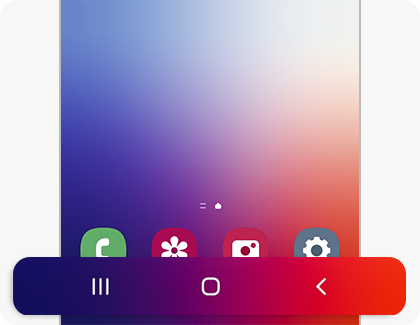
- Recents: Located on the far left. Tapping this button displays all recently opened apps.
- Home: Positioned at the center. Tapping this button takes you directly to the Home screen.
- Back: Found on the far right. Tapping this button returns you to the previous screen.
Note: The Navigation bar may disappear while using full-screen apps, like games or video streaming services. To temporarily view the bar during these instances, simply swipe up from the bottom of the screen.
You have the option to rearrange the order of the buttons on the Navigation bar to suit your preferences.
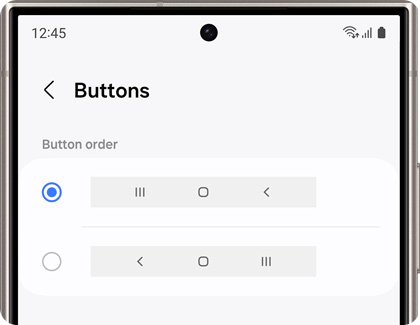
Note: Changing the button order will also alter the locations from which you swipe when using gesture navigation.
You can navigate your device using gestures instead of buttons if you prefer a simpler interface, or if you'd like to remove the buttons from your screen for a cleaner appearance.
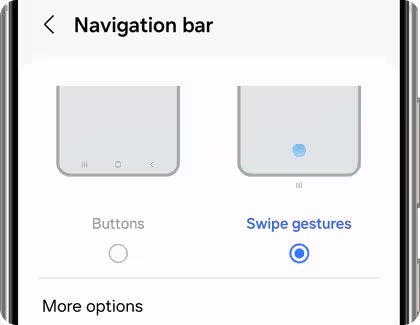
Gestures “Swipe from side and bottom” (available on all devices)


Swipe in from the sides
Returns you to the previous screen.


Swipe up from the bottom
Takes you back to the Home screen.


Swipe up and hold
Displays your recently used apps.
Gestures “Swipe from bottom” (available on devices using One UI 6.0 and older UI)
- Far left: Swipe up from the bottom to access your recently opened apps.
- Center: Swipe up from the bottom to return to the Home screen.
- Far right: Swipe up from the bottom to go back to the previous screen.
Note: If your mobile device operates on One UI 6.1 or newer, you can only use Swipe from side and bottom gestures. For devices running One UI 6.0 or older versions, you have the option to choose between Swipe from side and bottom and Swipe from bottom gestures for navigation.
The Navigation bar on the main screen of the Galaxy Z Fold series and Galaxy Tabs can be positioned to the left, right, or center. This allows you to choose a position that's most comfortable for use, no matter how you hold your device!
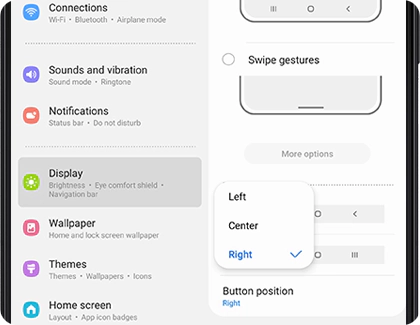
Note: If you use the Taskbar feature you can only position the Navigation bar on the left or right of the main screen.

Is this content helpful?
Thank you for your feedback!
Please answer all questions.