Connect your Samsung Galaxy to the Internet
Whether you’re setting up Wi-Fi, sharing your connection, or managing data, this guide has all the steps you need. We'll help you connect to Wi-Fi networks, use your device as a hotspot, and even dive into settings like a tech whiz to ensure you’re always online when you need to be. Follow along to not only boost your connectivity skills but also add a dash of efficiency to your digital life with your Samsung Galaxy.
Note: Information provided is specific to mobile devices sold in Canada. Screen availability and settings may vary by wireless service provider, software version and model.
Learn how to quickly connect your device to a Wi-Fi network. This section provides step-by-step instructions to ensure you can easily access wireless internet, whether at home, work, or on the go.
Important: If you are attempting to connect to a network that is protected by a password, you must obtain the password to establish a connection.


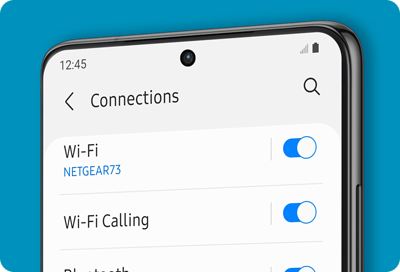
Step 1. Open the Settings menu and tap Connections.


Step 2. Tap Wi-Fi.


Step 3. Wi-Fi must be activated to see available networks. Tap the toggle if necessary.


Step 4. Tap the name of the Wi-Fi network you want to connect to.


Step 5. If the access to the Wi-Fi network is protected by a password you will need to enter the password and tap Connect.


Step 6. Once connected successfully, the network name will appear under “Current network” with “Connected” displayed below it.
Notes:
- Password accuracy: The most common issue when connecting to a Wi-Fi network is entering an incorrect password, often due to typos. To avoid this, use the unhide option (represented by an eye icon) next to the password field to check what you've entered.
- Router passwords: For home Wi-Fi networks, you can usually find the password printed on a sticker on the router itself.
- Public Wi-Fi access: Many public networks do not require a password but will direct you to a sign-in page where personal details are requested. For privacy, consider using a pseudonym and a dedicated email address for accessing public Wi-Fi to reduce spam and protect your personal information.
- Network selection caution: Always ensure you are connecting to the correct and intended Wi-Fi network, especially in public spaces. Connecting to an unsecured or suspicious network can expose your device to security risks.
Being connected to a Wi-Fi network is crucial, but the strength of that connection is equally important for seamless internet navigation and accessing online services. The key factor determining this strength is the distance between your mobile device and the Wi-Fi access point. To assist you, your device displays a dynamic Wi-Fi strength indicator icon in the top right corner of the screen. This icon not only confirms your internet connection (making it a useful tool for troubleshooting connection issues) but also illustrates the signal's strength through the number of displayed signal bars. Below, we provide an overview of various signal strength scenarios, helping you interpret the signal quality and understand its practical implications for your usage:


Excellent connection
This is the perfect situation, usually encountered at home or near the Wi-Fi access point. An excellent connection ensures seamless access to online services and uninterrupted streaming or downloads. You will experience optimal performance, allowing you to access any information or service you require without delays.


Good connection
This connection is sufficient for most online activities, including browsing, email, and standard-definition video streaming. You might experience slower speeds or minor interruptions during high-bandwidth tasks like HD video streaming or large downloads.


Poor connection
This level of connection can be challenging and may only be suitable for light web browsing and sending emails. Activities like streaming, online gaming, or downloading files may be heavily impacted, leading to frequent interruptions and prolonged load times.
Note: If the Wi-Fi signal icon displays no signal bars, it indicates that while your device may still be connected to the network, no online activities can be carried out. This situation often occurs in public places with many users attempting to access the same connection, which may not provide sufficient bandwidth for all. In such cases, consider moving closer to the Wi-Fi access point or connecting to a different network to restore internet functionality.
In today's digital age, internet security has become paramount, leading to increasingly complex passwords that often include lengthy combinations of characters and special symbols. This complexity can make sharing a password cumbersome, even when you know it by heart. Fortunately, if your Samsung Galaxy device is already connected to a Wi-Fi network, you can swiftly generate a QR code to share network access with any other device equipped with a camera and QR code reading capability. Follow these simple steps to create a QR code that will allow additional devices to easily connect to your network:


Step 1. Open the Settings menu and tap Connections.


Step 2. Tap Wi-Fi.


Step 3. Tap the Settings icon (represented by a gear) next to the Wi-Fi network you are currently connected to.


Step 4. Tap QR code at the bottom of the screen.


Step 5. The QR code will now be displayed on your screen, allowing for easy sharing of your Wi-Fi connection.
Note: To access your Wi-Fi network via the QR code, users should open their Camera app and point it steadily at the QR code for 2 to 3 seconds to allow for scanning. Upon successful recognition, a popup notification will appear. Simply tapping this notification will automatically connect the device to your Wi-Fi network.
In certain scenarios, it's beneficial to forget a Wi-Fi network you've previously connected to. Here are a few reasons why this can be helpful:
- Security: If you no longer use a network that was once secure but is now less so, forgetting it prevents your device from automatically connecting to it in the future, protecting your data and device from potential threats.
- Troubleshooting connection issues: Forgetting a network can help resolve connection problems. When you reconnect, your device will treat it as a new connection, which means it will go through the entire setup process again. This can clear any errors that occurred with the previous connection.
- Managing network clutter: Over time, your device might store many Wi-Fi networks you no longer use. Forgetting these networks helps keep your Wi-Fi list manageable and prioritizes connections to networks that you use more frequently.
- Resetting network settings: If there have been changes to the network’s settings (like a new password or different configuration), forgetting the network allows you to reset and reconnect with the updated settings.
- Privacy concerns: In scenarios where you connect to networks in places you visit infrequently or temporarily (like hotels or cafes), forgetting the network once you leave ensures your device won't automatically reconnect or show you as connected to those locations in the future.
When you're ready to forget a Wi-Fi network you are currently connected to, follow these simple steps:


Step 1. Open the Settings menu and tap Connections.


Step 2. Tap Wi-Fi.


Step 3. Tap the Settings icon (represented by a gear) next to the Wi-Fi network you are currently connected to.


Step 4. Tap Forget at the bottom of the screen.
Note: The steps described above are specific to a Wi-Fi network you are currently connected to. However, it is possible to forget a network you were previously connected to, no matter how long ago. Your Samsung Galaxy remembers all Wi-Fi networks to which you have connected, eliminating the need to re-enter passwords or remember them. Instructions for forgetting a previously connected network, which you are not currently connected to, will be provided in the following section.
Your Samsung Galaxy not only enables connection to Wi-Fi networks but also remembers every network to which you've ever been connected. This functionality ensures that reconnecting to familiar networks is seamless and automatic, sparing you the need to recall or re-enter passwords. However, there may be instances when you want to clear out old connections, particularly if they're no longer used or secure. Here are a few reasons why managing your saved networks can be beneficial:
- Security: Forgetting networks that are no longer secure prevents your device from automatically connecting in the future, thereby protecting your data and device from potential threats.
- Troubleshooting connection issues: Forgetting a network can help resolve connection problems. Reconnecting treats the network as new, potentially clearing any previous errors.
- Managing network clutter: Over time, your device may store many Wi-Fi networks that you no longer use. Forgetting these networks helps keep your Wi-Fi list manageable and focuses on networks that you frequently use.
- Resetting network settings: Changes in network settings, like new passwords or configurations, require forgetting the network to reset and reconnect with the updated settings.
- Privacy concerns: For networks in temporary locations like hotels or cafes, forgetting the network after leaving ensures your device does not automatically reconnect or display connections to those locations in the future.
In the previous paragraph, we covered how to forget a network you are currently connected to. However, your Samsung Galaxy also allows you to forget any previously saved network. Follow these simple steps to manage your saved networks:


Step 1. Open the Settings menu and tap Connections.


Step 2. Tap Wi-Fi.


Step 3. Tap the More options icon (represented by three vertical dots at the top right corner of the screen).


Step 4. Tap Advanced settings.


Step 5. Tap Manage networks.


Step 6. Scroll through the list of saved networks and select the one you want to remove.


Step 7. Tap Forget at the bottom of the screen.
Note: You can also remove multiple or all saved networks simultaneously. On the “Manage networks” screen, tap Delete located at the bottom. From there, select the networks you wish to forget, or choose All at the top left corner of the screen to select all networks. Confirm your selection by tapping Delete twice, effectively removing the selected networks from your saved network list.
A Mobile Hotspot allows your phone to function as a portable wireless router, providing internet access to other devices through its cellular data connection. This feature is especially useful when traditional Wi-Fi is unavailable or when you need internet access for devices that lack cellular data capabilities, such as laptops or tablets. By activating your Mobile Hotspot, you can ensure that you and others stay connected to the internet wherever you go, making it ideal for travel, outdoor work, or emergency situations where reliable internet is a must.
Notes:
- Data usage: Be mindful when using your device as a Mobile Hotspot, as it utilizes your mobile data plan. Keeping track of data usage is important to avoid unexpected charges, especially if your plan has data limits.
- Battery drainage: Operating your device as a hotspot can significantly drain its battery life. Ensure your device is charged adequately or plugged in during prolonged use to prevent it from turning off unexpectedly.
Follow these straightforward steps to activate your Mobile Hotspot:


Step 1. Open the Settings menu and tap Connections.


Step 2. Navigate to and tap Mobile Hotspot and Tethering.


Step 3. Tap Mobile Hotspot.


Step 4. Tap the toggle at the top of the screen to turn on your Mobile Hotspot.


Step 5. Check the Network name and Password displayed on the screen. These details are necessary to identify and connect other devices to your Mobile Hotspot.
Notes:
- Connecting devices: Other devices can connect to your Mobile Hotspot just as they would to any traditional Wi-Fi network. Simply select the network name from their Wi-Fi settings and enter the password when prompted.
- QR code sharing: For added convenience, you can share your Mobile Hotspot access using a QR code. Tap on the QR code option (at the bottom of the screen) to generate and scan the code. This method automatically incorporates the password, eliminating the need for manual entry. However, be mindful that QR codes are not encrypted: anyone who obtains access to your QR code can determine your network’s password.
- Customization options: You have the ability to personalize your Mobile Hotspot by changing settings such as the network name, password, and other configurable options to enhance security and usability. See the following paragraph for detailed instructions on how to customize these settings.
Default settings for your Mobile Hotspot are designed to meet the needs of most users. However, if you require a more tailored connectivity experience, several customization options are available. You can personalize your Mobile Hotspot by changing the network name, updating the password, or setting a mobile data limit to prevent unexpected data usage. These adjustments allow you to enhance security, manage data consumption effectively, and ensure your hotspot meets your specific needs.
Below are some key steps to customize your Mobile Hotspot settings. These represent common options, though not an exhaustive list, to tailor your hotspot to your preferences:
Step 1. Open the Settings menu and tap Connections.
Step 2. Navigate to and tap Mobile Hotspot and Tethering.
Step 3. Tap Mobile Hotspot.
Step 4. Ensure the Mobile Hotspot is activated by tapping the toggle at the top of the screen, as settings can only be modified when it is on.
Step 5. Tap Network name or Password to modify the respective details of your Mobile Hotspot.


Step 6. Enter a new network name or password, and adjust any other settings as needed. Tap Save to confirm your changes.


Step 7. Tap Mobile data shared today at the top of the screen.


Step 8. Monitor your data usage with the counter displayed. To prevent exceeding your data allowance, tap Set data limit to establish a usage cap.


Step 9. Enter your desired data limit in MB and tap OK to confirm the setting.
Note: The steps provided here offer a basic overview and are not meant to be exhaustive. We encourage you to explore and customize your settings further to fully tailor the Mobile Hotspot experience to your needs.
Notes:
- Availability: Wi-Fi Calling may not be available with all carriers or on all devices.
- Requirements: Your SIM card must be inserted, or the built-in eSIM must be active to use Wi-Fi Calling, even though an active mobile network connection is not required.
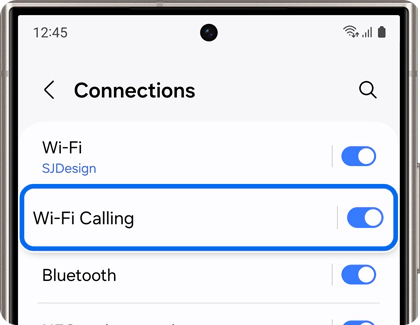
With Wi-Fi Calling, you can make calls and send messages over a Wi-Fi connection when cellular service is unavailable. Importantly, this feature must be activated in advance while your mobile device is connected to a Wi-Fi network and has an active service connection through either a physical SIM card or an eSIM.
Activate Wi-Fi Calling
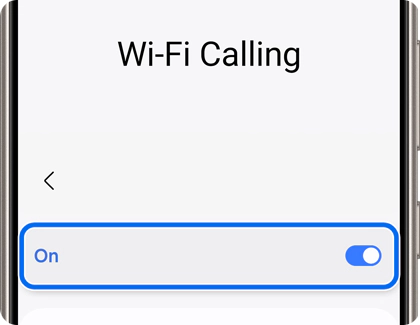
Important: You must be connected to a Wi-Fi network and have an active service through a SIM card or eSIM to enable Wi-Fi Calling.
Use Wi-Fi Calling
Before making a call using Wi-Fi Calling, ensure you meet all necessary requirements. First, confirm that your device is connected to a Wi-Fi network as a strong connection is essential for optimal performance. Additionally, ensure that your SIM card is properly inserted or that the built-in eSIM is active. Once set up, making a call via Wi-Fi Calling is as straightforward as making a regular phone call. Simply dial the number and proceed as usual.
Alternatives to Wi-Fi Calling
Beyond Wi-Fi Calling, there are popular messaging apps that provide similar functionality without being tied to a specific carrier. Apps like WhatsApp, Facebook Messenger or Viber allow you to make calls and send messages over any Wi-Fi connection. These apps are particularly useful in scenarios where Wi-Fi Calling is not supported by your carrier or when traveling abroad, offering a convenient and cost-effective way to stay connected. The only requirement is that both parties have the app installed and an account set up.
You can check your current mobile and Wi-Fi data usage, as well as customize data warnings and limits to stay informed and avoid unexpected charges. Managing your data effectively helps ensure you maximize your plan without overage costs:


Step 1. Open the Settings menu and tap Connections.


Step 2. Navigate to and tap Data usage.


Step 3. Review the mobile data usage counter at the top of the screen. Use this information to ensure you stay within the data limits of your plan.


Step 4. Navigate to and tap Wi-Fi data usage.


Step 5. View your Wi-Fi data usage displayed as a graph for the billing period. Below the graph, a detailed breakdown per app is provided.
Note: The steps provided here are intended as a basic overview and are not exhaustive. We encourage you to explore and adjust your settings further to fully tailor the data usage monitoring and managing experience to your specific needs.
Think of your mobile device as your passport to the internet; in this analogy, the Wi-Fi MAC address serves as your unique passport number. A MAC address is a distinct 12-character code assigned by Samsung to your specific device, identifying it on networks.
For most users, the specifics of MAC addresses are not a daily concern. However, there are certain scenarios, particularly in professional or secure environments, where knowing your MAC address is crucial. It's important to handle this information carefully and share it only with trusted individuals. Additionally, you might need your MAC address for connecting to Wi-Fi networks that restrict access based on the device's MAC address or when seeking technical support for network issues.
Follow these simple steps to locate the MAC address of your mobile device:


Step 1. Open the Settings menu. Then, navigate to and tap About phone or About tablet.


Step 2. Tap Status information.


Step 3. Locate and view the information under Phone Wi-Fi MAC address or Tablet Wi-Fi MAC address.
Resetting the Wi-Fi settings on your Samsung Galaxy can effectively resolve connectivity issues. Before delving into more intensive troubleshooting methods (see next paragraph), a soft reset of your Wi-Fi settings is a quick and easy first step to try. This simple procedure often resolves common connectivity problems by refreshing your device’s Wi-Fi function without affecting your data or active connection.


Step 1. Open the Settings menu and tap Connections.


Step 2. Tap switch next to “Wi-Fi” to turn it off.


Step 3. Wait a few seconds and tap the switch again to turn the Wi-Fi back on.
Notes:
- Router reset recommendation: We strongly recommend resetting your router as well. This simple action can resolve many connectivity issues. Simply power it off, wait a few seconds, then power it back on. Allow a few minutes for the router to reboot fully.
- Wi-Fi settings reset: If you continue to experience connectivity issues after restarting your Wi-Fi, consider resetting your mobile device’s Wi-Fi settings. Detailed instructions are provided in the following section.
If the soft reset did not resolve your Wi-Fi connectivity issues, consider performing a full reset of your Wi-Fi and Bluetooth settings. This more comprehensive reset is straightforward and can effectively refresh all network settings, potentially fixing persistent connection problems. Importantly, this process will not affect your personal data. Follow the steps below to complete the reset:


Step 1. Open the Settings menu. Then, navigate to and tap General management.


Step 2. Swipe to and tap Reset.


Step 3. Navigate to and tap Reset Wi-Fi and Bluetooth settings.


Step 4. Review the information and then tap Reset settings.
Notes:
- Immediate reset caution: Be aware that there is no confirmation prompt. Once you tap Reset settings, the settings will immediately reset. You will need to reconnect to your Wi-Fi network (and Bluetooth devices) afterward.
- Router reset recommendation: We strongly recommend resetting your router as well. This simple action can resolve many connectivity issues. Simply power it off, wait a few seconds, then power it back on. Allow a few minutes for the router to reboot fully.
Staying safe and efficient while using the Internet on your Samsung Galaxy doesn’t have to be complicated. Here are some essential tips to help you navigate online spaces securely and make the most out of your connectivity features:
- Automatic reconnection: Once you connect to a Wi-Fi network, your device remembers it. This means that whenever you are within range and Wi-Fi is turned on, your device will automatically reconnect to that network, saving you time.
- Secure your connections: Always connect to secure networks, especially when handling sensitive information. Look for networks that require a password, as open networks can pose security risks.
- Use guest networks: When available, use guest networks for a safer browsing experience, especially in public places like coffee shops or airports. Guest networks are often more controlled and monitored.
- Limit data sharing on public Wi-Fi: Be cautious about the type of information you share or access over public Wi-Fi. Avoid online banking or shopping, and consider using a VPN (Virtual Private Network) to encrypt your data transfers.
- Manage network settings: Regularly review your device’s network settings to ensure features like network notification and auto-connect are configured according to your preferences and safety standards.
- Beware of phishing attempts: Be vigilant about links and emails you receive, especially those that request personal information. Phishing scams often use fake Wi-Fi networks or urgent-sounding messages to trick you into revealing personal details.
- Educate yourself about Wi-Fi security: Familiarize yourself with different security protocols like WPA2 and WPA3. Opt for networks that use these newer protocols to ensure better encryption and security.

Is this content helpful?
Thank you for your feedback!
Please answer all questions.