Cleaning your Jet™ Stick Dustbin and Filters
![]() Please Note: The information on this page is for Australian products only. Models, sequences, error codes or settings will vary depending on location and/or where the product had been purchased. To be redirected to your local support page please click here.
Please Note: The information on this page is for Australian products only. Models, sequences, error codes or settings will vary depending on location and/or where the product had been purchased. To be redirected to your local support page please click here.
During the process of using your Samsung Jet™ Stick vacuum to clean your home, the Jet™ Stick may begin to have build-up dust, dirt, and anything else it picks. This build-up can decrease the performance of your Jet™ Stick.
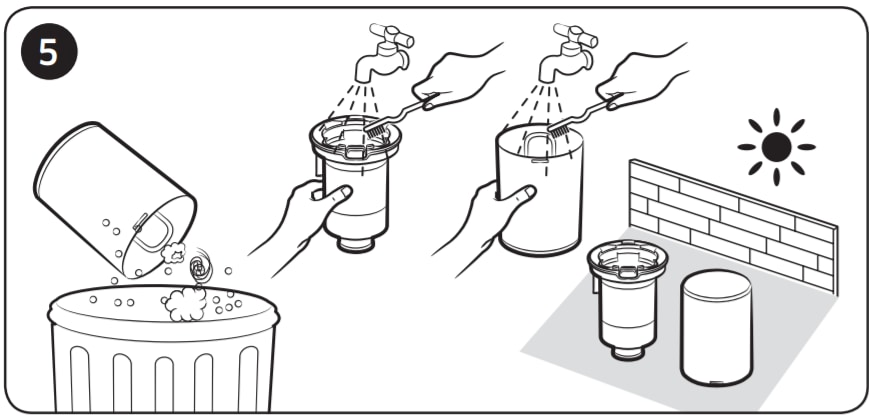
Follow the guide below for cleaning your Jet™ Stick dustbin and filters, including micro and fine dust.
Note:
- If you have foreign matter clogged in the wheels of your Jet™ Stick, you will need to contact our technical experts.
- If you need to purchase a new Vacuum Filter for your Jet™ Stick, click here.
- If you notice the display of your Jet™ Stick lighting up and are unsure what the icons mean, please refer to our Checking your Jet™ Stick Display page for more information.
- For instructions of how to clean the brush of your Jet™ Stick, please click here.
- If you are after information on Replacing the Clean Station™ Dust Bag, please click here.
- For information setting up and using the Jet™ Stick, click here.
- For information on cleaning the BESPOKE Jet™ Stick, click here.


Note: Do NOT pull the rubber attached to the metal mesh grille filter.

Tip: With the dustbin upright and a bag over the top, tip the dustbin so the contents fall into the bag to reduce dust clouds.


Washable Micro Filter:

*When heat is applied, product malfunction can occur.

Ultra Fine Dust Filter:
*When assembling, turn the filter until the line below the lock image is not visible.

For further assistance, please contact our Chat Support or technical experts on 1300 362 603. To find your Samsung product's User Manual, head to Manuals & Downloads.
Thank you for your feedback!
Please answer all questions.