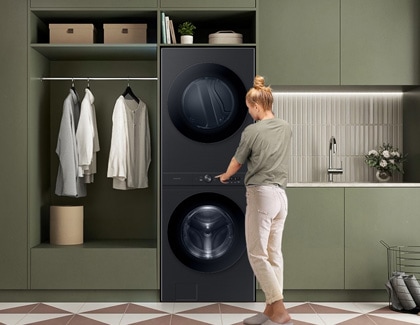
How to install your Samsung Bespoke AI Laundry Hub

Last Update date : Apr 26. 2024
A white Bespoke AI Laundry Hub is displayed in a stylish apartment

Ready to upgrade your home with the Samsung AI Laundry Hub? While setting up this sophisticated machine can be a bit complex, our guide will help you understand the steps involved. We aim to make the process as clear and enjoyable as possible. Remember, while it's absolutely possible to tackle this setup on your own, using a professional might be the best move to ensure everything runs smoothly from the start!

Note: Remember, while this guide offers an overview, your user manual is the go-to source for specific installation details.

A Samsung bespoke washer and dryer set stacked on top of each other in a wooden storage shelf

Before you start setting up your Laundry Hub, consider these safety tips and precautions:

  • It’s best to have a friend assist with unpacking.

  • Keep the Laundry Hub upright at all times.

  • Remove all packaging materials before installation.

  • Ensure installation on a solid, flat surface away from direct sunlight and heat sources.
A laundry room showing an empty area where the washer and dryer go when stacked on top of each other

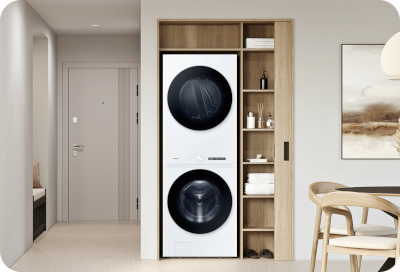
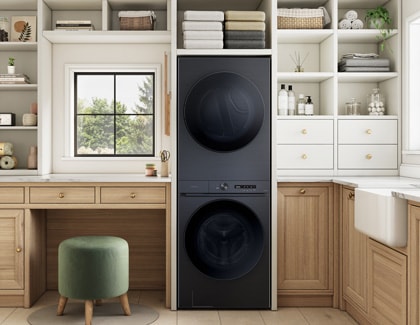
Get your laundry room, closet, or utility room ready for the Laundry Hub. Here’s what to consider as you prepare the space:

  • Measure to ensure the Laundry Hub fits without obstructing doors or passageways.

  • Choose a firm, level surface. Avoid carpeting or slippery floors to prevent movement and unbalanced loads.

  • Maintain an ambient temperature above freezing (32°F).

  • Ensure sufficient space for ventilation, wiring, water supply hoses, drain hose, and free door movement.

  • Consider a drip pan if installing above the ground floor. You can find drip pans at local home improvement and hardware stores.

Included with your Laundry Hub: Wrench, bolt caps, hose guide, cable tie, anti-slip pads.

A bunch of tools lined up in two rows

Additionally, you will need: Water hoses, pliers, cutting knife, nut screwdriver, Phillips screwdriver, level, duct tape, measuring tape, pipe wrench (for gas models), LPG-safe compound or Teflon tape (for gas models).

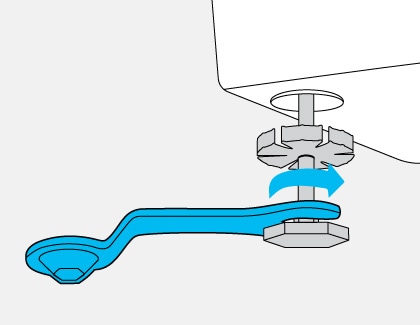
After unpacking the Laundry Hub, you must remove the shipping bolts:

1 Loosen the shipping bolts: Use the wrench included with your Hub to loosen all shipping bolts located at the back of the machine.
An illustration loosening the shipping bolts by turning counter clockwise and pulling outwards
2 Install bolt caps: Once the bolts are removed, fill the empty holes with the supplied plastic bolt caps to protect the threads and interior.

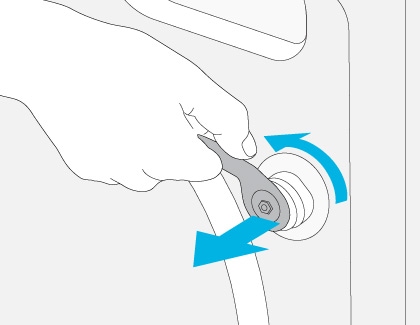
Note: Save the shipping bolts and spacers for future use if you plan to relocate your Laundry Hub.

3 Secure the caps: Press the bolt caps firmly into place to ensure they are securely fastened and flush with the machine's exterior.

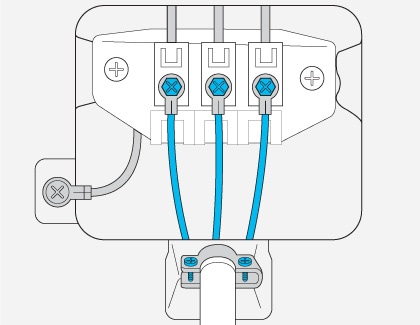
Ensure a secure and leak-free connection for your water supply hoses:

1 Attach hoses to taps: Connect the new water hoses to the hot and cold water taps. Tighten the fittings by hand and then use pliers for an additional two-thirds of a turn to secure them.
An illustration of a wrench tightening the water hose on the cold inlet

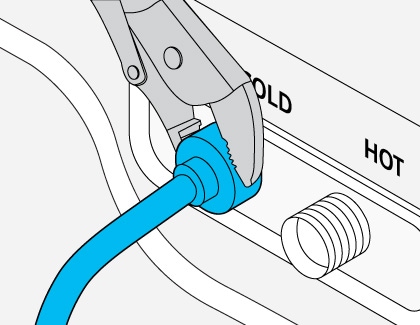
Note: Always use new hoses with rubber gaskets inside the couplings to prevent leaks. Keep the old hoses as backups or properly dispose of them.

2 Test the connections: Gently pull on the hoses to ensure they are securely attached.
3 Flush the hoses: Place the ends of the hoses in a bucket, open the taps for 10-15 seconds to flush out any impurities from the hoses, and then close the taps.
4 Connect to Laundry Hub: Attach the hoses to the corresponding hot and cold water inlets on the back of the Laundry Hub. Ensure each hose matches its designated inlet.
5 Secure the fittings: Hand tighten the hose fittings at the Hub and then use pliers to further tighten them by an additional two-thirds of a turn.
6 Check for leaks: Open the taps once more and check around the hose connections for any leaks.

Properly installing the drain hose is crucial to prevent water leaks and ensure efficient operation. There are two installation methods to choose from, depending on your setup:

  • Install in a standpipe or sink: Place the hose in a standpipe, laundry tub, or utility sink. Ensure the fixture is between 18 inches and 96 inches from the floor. Use the supplied hose guide to maintain a bend in the spout, securing it with zip ties to prevent kinks.

  • Install over a wash basin edge: Position the drain hose at a height of 24 to 35 inches from the floor using the plastic hose guide. Attach the guide to the wall with a hook for stable drainage.
An illustration of the hot and cold water inlets next to the drain hose bending downwards

Additional installation considerations

  • Depth of insertion: Insert the drain hose 6 to 8 inches into the standpipe, ensuring the connection is not airtight to prevent pressure issues.

  • Consider drain height: Installing the hose above 96 inches may decrease draining efficiency and could cause odors as water remains in the system.

  • Avoid low installation: If the hose is below 39 inches, it may trigger a siphoning effect, potentially causing the washer to display a 4C error code due to water draining back into cycles.

Proper leveling is crucial for optimal operation and to prevent excessive vibrations or noise during use:

1 Check stability: With both hands on opposite sides of the hub, gently rock it back and forth. If the hub moves in any direction, adjust the leveling feet: turn them clockwise to lower and counterclockwise to raise. Use the wrench provided to make these adjustments.
An illustration of a wrench turning the locking nut on a leveling foot clockwise
2 Secure the level: Once the hub is stable and level, tighten the locking nuts on each leg until they are snug against the bottom of the hub. This secures the legs in place, ensuring stability over time. Check that all feet are firmly touching the floor.
3 Test run: Optionally, run a small load of laundry to verify stability. If the hub rocks during operation, recheck and adjust the leveling as needed.

This step involves connecting your Laundry Hub to the power supply. Choose the instructions relevant to your model type and always refer to your user manual for specific details.

Gas models

1 Prepare the connection: Remove the protective cap from the gas pipe. Apply an LPG-safe compound or 1.5 wraps of Teflon tape to all threaded connections to ensure a secure seal.
2 Connect the gas line: Use an additional fitting to connect the 1.9cm female thread end of a flexible connector to the 1cm male threaded end on the hub. Tighten all fittings securely.
3 Check for leaks: Turn on the gas supply and use a soap solution to check for leaks at the connections. If you find a leak, tighten the fittings and check again. Avoid using an open flame to detect gas leaks.

Electric models

1 Access the terminal block: Loosen the screws on the central terminal block to prepare for wiring.
2 Connect the neutral wire: Attach the neutral wire (usually white or centered) to the middle, silver-colored screw on the terminal block. Tighten the screw to secure the wire.
3 Connect the power wires: Attach the remaining power wires to the appropriate outer terminal block screws. Ensure each wire is securely connected by tightening the screws.
Diagram showing the connection of blue electrical wires to a terminal block in an appliance, with clearly marked positive and negative terminals, secured by screws
4 Secure the connection: Tighten the strain relief screws to protect the wires from pulling.
5 Finalize installation: Place the terminal block cover on the rear panel of the hub and secure it with the hold-down screw.

Now that you've installed the Laundry Hub, it's time to calibrate it and perform a test cycle to verify functionality:

1 Prepare for calibration: Ensure the Laundry Hub is plugged in and the drum is devoid of laundry.
2 Start calibration: Press and hold the Start/Pause button to initiate the calibration. This should be done with an empty washer.
A person steps up to the Samsung Bespoke washer and dryer, preparing to initiate the calibration and test cycle in a home laundry room

Note: Calibration mode applies exclusively to the washing machine function.

3 Complete calibration: Once calibration is finished, the Hub will power off and then on again. For additional calibration, select Options, choose Calibration, and confirm with OK.
4 Power on the Hub: Turn on the hub and choose either WASHER or DRYER to set up for your test cycle.
5 Select a cycle: Use the Navigation dial to choose a cycle. Here, you can modify any cycle settings to your preference.
6 Run the test cycle: Press and hold Start/Pause again to start the test cycle, letting the Hub run through the complete cycle.

Note: The Start/Pause button functions differently for the washer and dryer—use the upper button for the dryer and the lower button for the washer.

Click Here

Need More Support?

Chat With Us. Service & Support Available 24/7.

Thank you for your feedback!

The coding for Contact US > Call > View more function. And this text is only displayed on the editor page, please do not delet this component from Support Home. Thank you